How Can I Avoid URL Conflicts in WordPress When Managing Pages and Categories?
WordPress organizes and retrieves content based on URL structures. These URLs are crucial for categorization, navigation, and, importantly, SEO optimization.
Mismanagement of these URLs can lead to conflicts and hinder user experience and search engine indexing.
Understanding the Issue
In WordPress, different content types (like product pages, categories, and product categories) are typically accessed via distinct URL paths.
However, if these paths are not managed carefully, URL conflicts can occur, especially after making changes to the URL structure.
Example of a Common URL Conflict
Consider the following scenario:
Before Change:
/name – a page
category/name – a category (here, ‘category’ is a prefix indicating that the URL points to a specific category page).
product_category/name – a product category (in this case, ‘product_category’ is a prefix that shows this URL is associated with a particular product category).
After Change:
/name – now intended to serve a page, a category, and a product category
In the above example, removing the category path (category/ or product_category/) that helps differentiate URLs leads to all three types of content being called through the same URL (/name).
In this case, WordPress will only load the first record associated with /name from its database, as you no longer have 3 distinct URLs.
So, instead of accessing three different content types through three unique URLs as originally intended, visitors will only be able to reach the first type that WordPress retrieves from the database.
This limits access to just one type of content under the single shared URL.
Consequences
User Experience: Users may not find the content they are looking for, leading to frustration and increased bounce rates.
SEO Impact: Search engines might index only one type of content under the URL, thereby ignoring others, which could dilute the SEO effectiveness of your site.
Solution: Unique Naming Convention
Ensure that products, categories, and product categories each have unique, different names.
This prevents overlap in URL paths and maintains clear navigation paths for both users and search engines.
How to Set up sitemap.xml on Apache Servers?
Squirrly SEO automatically generates your sitemap when you enable the XML Sitemap settings.
On some Apache servers, based on the server configuration, you may need to add server-level rewrites to correctly set up the sitemap.xml file.
For this purpose, we recommend setting the following rules for Squirrly SEO sitemap in .htaccess file:
NOTE! In case you are not 100% sure where to add these rules, we recommend reaching out to your web host or server admin and asking for further assistance.
Still Need Help?
If you’ve added the rewrite rules in the correct file, and you still encounter issues, they are likely linked to other settings on your server. You can always reach out to our support team via one of the available channels whenever you need more assistance.
What Database Tables Does Squirrly SEO and Squirrly SEO Advanced Pack Create?
The Squirrly SEO plugin and the Squirrly SEO – Advanced Pack plugin (which is necessary for accessing various Squirrly features and is included at no additional cost) both create certain database tables for your WordPress site, each serving a specific purpose.
More specifically, the database tables that Squirrly SEO creates are:
wp_qss: This is the SEO Snippet table; created after installing/activating the Squirrly SEO plugin and activating the Bulk SEO & Snippets feature for your WordPress site.
Database tables created by Squirrly SEO – Advanced Pack:
wp_qss_redirects: Generated upon installing the Squirrly SEO – Advanced Pack plugin and activating the Redirects feature.
wp_qss_redirects_log: Generated upon installing the Squirrly SEO – Advanced Pack plugin and activating the Redirects feature. This is a log/monitor table for the redirects.
wp_qss_jsonld: Created when you install the Squirrly SEO – Advanced Pack plugin and activate the Rich Snippets feature.
IMPORTANT! All these database tables are created only upon activation of the mentioned features.
Option to Delete Tables on Uninstall
In Squirrly SEO > SEO Configuration > Tweaks & Sitemap > Advanced Settings, there’s an option labeled “Delete Squirrly SEO Table on Uninstall“
This option ensures that you have control over the data. If you check this box, all the Squirrly SEO tables will be permanently deleted from the database when you uninstall Squirrly. No trace of information will be left behind. Everything will be deleted from the database.
Only activate this option when you are 100% sure you no longer want to use Squirrly SEO and need to permanently delete all data related to Squirrly SEO from your WordPress site.
How To Use Redirects with Regular Expression & Regex?
A regular expression, often referred to as regex, is a set of characters used to identify patterns within a given piece of text. In the context of Squirrly > Redirects, a plain URL match corresponds to a single URL, while a regex URL can match multiple URLs.
Beyond just matching URLs, regular expressions in Squirrly > Redirects have the capability to extract information from the source URL and transfer it to the target URL. For instance, using the regex /my-url/.* will match requests for various URLs starting with “/my-url/,” allowing flexibility in redirection.
Understanding the syntax is crucial. The .* in /my-url/.* represents a regular expression, signifying “match /my-url/ followed by any sequence of characters.” To enable regular expression matching in Squirrly > Redirects, ensure the ‘regex’ option is enabled.
Regular Expression Syntax: The .* in a regular expression like /my-url/.* is interpreted as “any character” (.), and the asterisk (*) means any number of the preceding expression. Regular expressions can become quite intricate, allowing for detailed and complex patterns.
Extracting Source Information: Regular expressions not only match multiple URLs but also extract information from the source URL for use in the target URL. For instance, using /oldpage/(.*) captures data within the brackets, allowing it to be reused in the target URL as $1.
Infinite Loops: A common challenge with regular expressions is the potential for infinite redirects. This occurs when a regex redirects to a URL caught by the same regex, creating a loop. To prevent this, using the ^ character at the start of the regex limits matches to the beginning of the URL.
Testing Regular Expressions: Various online tools, such as regexr.com and regex101.com, can help test and experiment with regular expressions. Keep in mind that Squirrly SEO uses PHP’s regular expressions (PCRE), which may differ slightly from other libraries.
Common Regular Expressions for WordPress: Below are some commonly used regular expressions for WordPress with the ‘regex’ option enabled:
Redirect date and name permalink:
Source: ^/\d{4}/\d{2}/\d{2}/(.*)
Target: /$1
Redirect date, name, and category permalink:
Source: ^/\d{4}/\d{2}/\d{2}/.?/(.)
Target: /$1
Redirect all URLs to /blog/ except those starting with /blog/:
Source: ^/(?!blog)(.*)
Target: /blog/$1
Redirect every page on the old site to the new site:
Source: /(.*)
Target: https://newsite.com/$1
Remove .html from Blogger pages:
Source: ^/(.*?).html$
Target: /$1/
What steps should I follow to ensure that Squirrly SEO can fetch values directly from wp_postmeta, if importing them via Excel?
What is wp_postmeta?
Every post contains an associated set of data, referred to as metadata, which is stored in the wp_postmeta table within your WordPress database.
Each entry in the wp_postmeta table is connected to a post and has a key-value pair, where the key is the name of the metadata element and the value is the metadata value.
Here’s a brief rundown of what each column in the wp_postmeta table represents:
meta_id: A unique identifier for each metadata entry.
post_id: The ID of the post this metadata is associated with.
meta_key: The name of the metadata element.
meta_value: The value of the metadata element.
In this setup, meta_key would be the name you give to a specific piece of information you’re storing about a post.
For instance, if you were storing the price of items as metadata, the meta_key might be “price”, and the meta_value would be the actual price of the item.
Now, if you want to import values from Excel, CSV, or another feed into wp_postmeta and want Squirrly SEO to be able to directly fetch the values from wp_postmeta, you just need to insert the following meta_key/value pairs in wp_postmeta:
_sq_description (string) = with the description from Squirrly SEO Snippet
_sq_keywords (string) = with the keywords from Squirrly SEO Snippet, separated by commas
Note! (string) indicates the data type of the metadata value you are setting. In programming, a string is a data type used to represent text rather than numbers. It signifies that the value for _sq_title, _sq_description, and _sq_keywords should be text.
That’s it! By adding/storing these meta_keys in wp_postmeta, Squirrly SEO will be able to retrieve the values directly from wp_postmeta for a particular post.
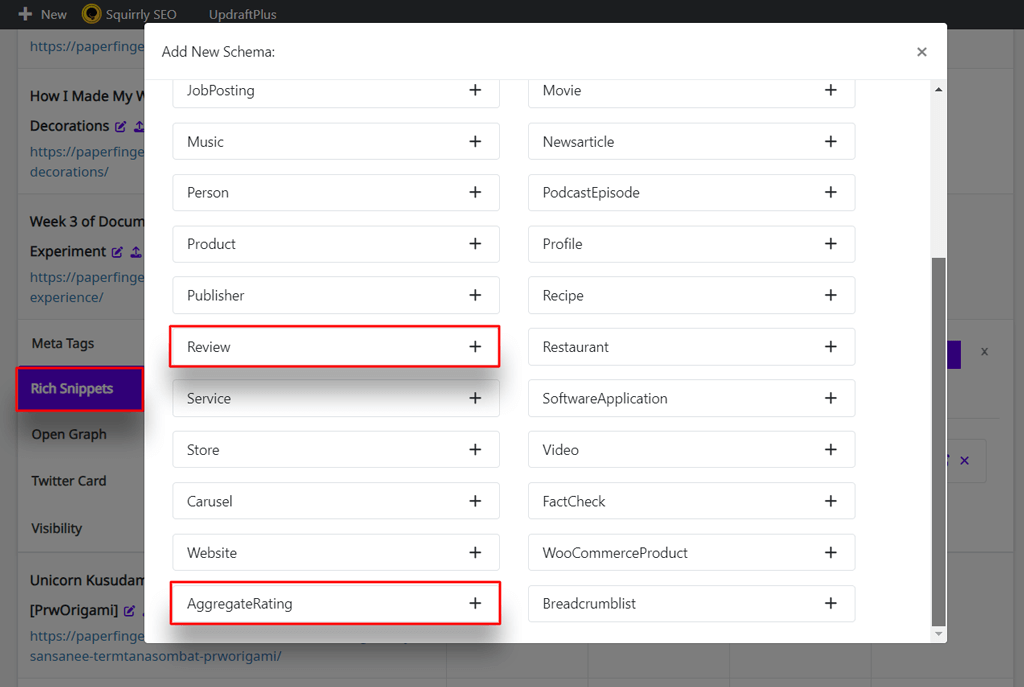
What’s the Difference between Review & AggregateRating Schemas and Other Schema Types?
With the release of version 2.2.9 of Squirrly SEO’s Advanced Pack, we introduced two new schema types that you can build using the Rich Snippets feature, namely:
“Review” Schema
“AggregateRating” Schema
To reach the Rich Snippets feature, go to Squirrly SEO > Bulk SEO > METAs > Rich Snippets.
In this short tutorial, we’ll focus on what these two new schema types help you achieve and how they are different from other schema types that you can build using Squirrly, such as “Book,” “Course,” “Event,” and more.
More about the Review and AggregateRating Schemas
These schema types are used to provide structured data about reviews and ratings for a specific item, such as a product or a service.
Review Schema. This schema type is designed to represent a short excerpt of a review or a rating of an individual item – for example, of a book, movie, recipe, or store.
AggregateRating Schema. This schema type is designed to represent the average rating of an item – for example, of a book, movie, recipe, or store – based on multiple ratings or reviews.
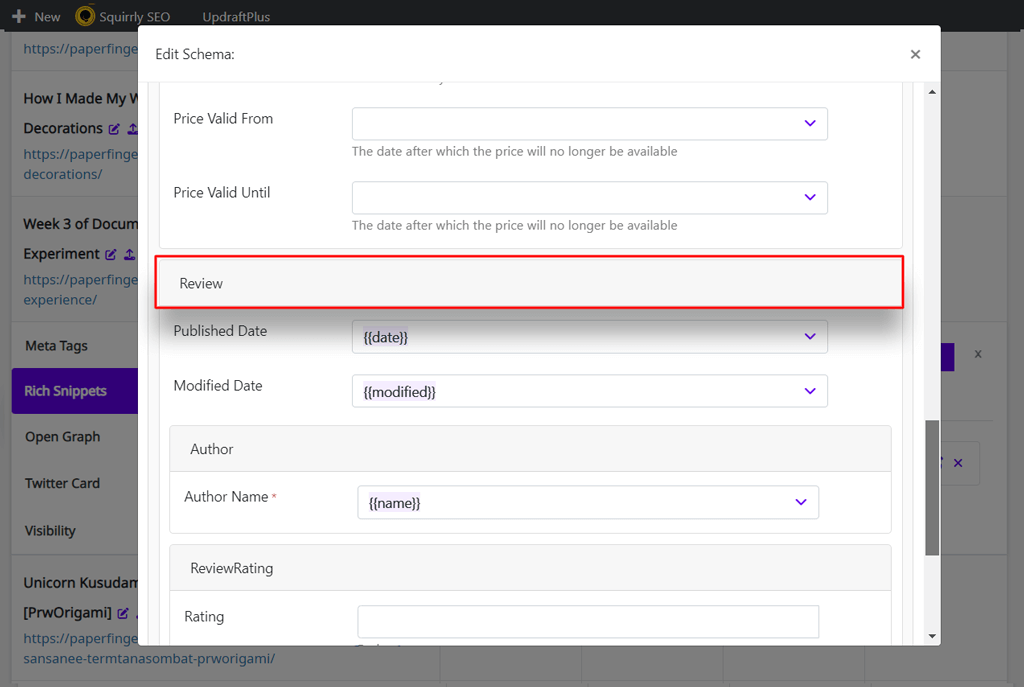
Nesting a Review into Another Schema Type
When using Squirrly’s Rich Snippets feature, you’ll notice that many of the different schema types come with an additional “Review” option.
This option allows you to combine multiple structured data by adding one or more reviews within the chosen schema type.
So, for example, if you select the “Product” schema, you can incorporate multiple reviews for that particular product as part of the “Product” schema type.
This process is called nesting and describes the addition of other structured data types within the main structured data.
Nesting a review into another schema type is a common practice to provide detailed information about an item and user feedback simultaneously.
Here’s an example of a review that’s nested in a “Product” schema type.
<html>
  <head>
    <title>The Catcher in the Rye</title>
    <script type="application/ld+json">
    {
      "@context": "https://schema.org/",
      "@type": "Product",
      "brand": {
        "@type": "Brand",
        "name": "Penguin Books"
      },
      "description": "The Catcher in the Rye is a classic coming-of-age story: an story of teenage alienation, capturing the human need for connection and the bewildering sense of loss as we leave childhood behind.",
      "sku": "9780241984758",
      "mpn": "925872",
      "image": "https://www.example.com/catcher-in-the-rye-book-cover.jpg",
      "name": "The Catcher in the Rye",
      "review": [{
        "@type": "Review",
        "reviewRating": {
          "@type": "Rating",
          "ratingValue": "5"
        },
        "author": {
          "@type": "Person",
          "name": "John Doe"
        }
       },
      {
        "@type": "Review",
        "reviewRating": {
          "@type": "Rating",
          "ratingValue": "1"
        },
        "author": {
          "@type": "Person",
          "name": "Jane Doe"
        }
      }],
      "aggregateRating": {
        "@type": "AggregateRating",
        "ratingValue": "88",
        "bestRating": "100",
        "ratingCount": "20"
      },
      "offers": {
        "@type": "Offer",
        "url": "https://example.com/offers/catcher-in-the-rye",
        "priceCurrency": "USD",
        "price": "5.99",
        "priceValidUntil": "2020-11-05",
        "itemCondition": "https://schema.org/UsedCondition",
        "availability": "https://schema.org/InStock",
        "seller": {
          "@type": "Organization",
          "name": "eBay"
        }
      }
    }
    </script>
  </head>
  <body>
  </body>
</html>
Similarly, for “Events,” “Courses,” “Movies,” “Books,” and others, you can include one or more reviews, and Squirrly will automatically generate the “AggregateRating” schema from those reviews.
Does Google Like You Adding One Structured Data inside another Type of Structured Data?
Here’s what Lizzi Sassman, tech writer at Google, had to say about this:
“Yep. Nesting your structure data can help us understand what the main focus of the page is. For example, if you put recipe and review at the same level, it’s not as clear as telling us that the page is a recipe with a nested review.
This means that the primary purpose of the page would be a recipe and that the review is a smaller component of that.”
Before we get into the solution, it’s important to understand what RSS feeds are and why they matter. RSS stands for “Really Simple Syndication.” It’s a technology that allows people to subscribe to a website’s content, so they can receive updates automatically. When you publish new content on your website, your RSS feed is updated automatically, and your subscribers receive a notification.
WordPress automatically generates RSS feeds for your website, including feeds for your categories. This means that your readers can subscribe to updates for a specific category of content, rather than receiving updates for all of your content. This is a useful feature because it allows readers to stay informed about the topics they care about most.
However, the downside of having category-specific RSS feeds is that Google sees those feeds as separate pages and warn you that the feed pages can’t be indexed.
How do you remove the WordPress feed on categories?
The solution is to add some code to your WordPress theme’s functions.php file. Here’s the code you need to add:
This code creates a function called sq_no_category_rss_feed that checks if the current page is a feed. If it is, the function then checks if the URL contains “/feed”. If it does, the function redirects the user to the same URL without the “/feed” at the end. This effectively removes the feed on categories and avoids the issue of Google Search Console showing these URLs as not indexed.
Once you have added this code to the functions.php file, save the file and upload it back to your WordPress installation. You should now be able to check your site in Google Search Console and see that the feed URLs on categories are no longer showing up as not indexed.
It’s important to note that removing the WordPress feed on categories is not ideal for all websites. If your site has a lot of content, and you cover a wide range of topics, then having category-specific RSS feeds can be very useful for your readers. In this case, you may want to leave the feeds as they are.
How to Fix 403 Forbidden Error with IndexNow?
Did you encounter a 403 Forbidden error while trying to access the IndexNow key location?
No need to be alarmed!
Keep reading to learn more about:
what might be causing the 403 Forbidden error;
what you can do about it so that you can index your website with IndexNow.
Don’t worry, it’s an easy fix, so let’s get to it!
403 Forbidden Error when Trying to Access IndexNow: Possible Reasons
The 403 Forbidden error can be caused by several reasons, but the most common is that the API key file has not been generated automatically. This issue might arise from a plugin conflict.
Lucky, resolving the 403 Forbidden error with IndexNow is straightforward and can be done by completing just a few steps.
Here’s how:
Fix the 403 Forbidden Error by Changing the API Key in Squirrly SEO
To submit URLs to the IndexNow API, you must “prove” ownership of the site for which URLs are being submitted. This requires an API key. Squirrly automatically generates an API key for your website and dynamically hosts it on your website.
Once generated, the IndexNow API Key will be displayed in the IndexNow Key field.
To change the API Key in Squirrly SEO:
Go to: Squirrly SEO > IndexNow > Settings > IndexNow Key. Then click on the“Reset Key” button shown below. Squirrly will then generate a new API Key for your site instantly.
Once you’ve completed this step, clear the cache and make sure that your API key is accessible to search engines. For this:
Go to: Squirrly SEO > IndexNow > Settings > IndexNow KeyURL
Click on the yellow“Check Key” button shown in the screenshot below
Clicking on the Check Key button will open a new tab.
If the new tab displays your API key, you’re all set!
You can rest assured knowing that search engines will have access to the API key to verify ownership (assuming that access to this page is not restricted via robots.txt).
What if Changing the API key from within Squirrly SEO Doesn’t Work?
In case changing the API key from within Squirrly doesn’t work for you, there’s another quick solution that’ll fix the 403 Forbidden Error.
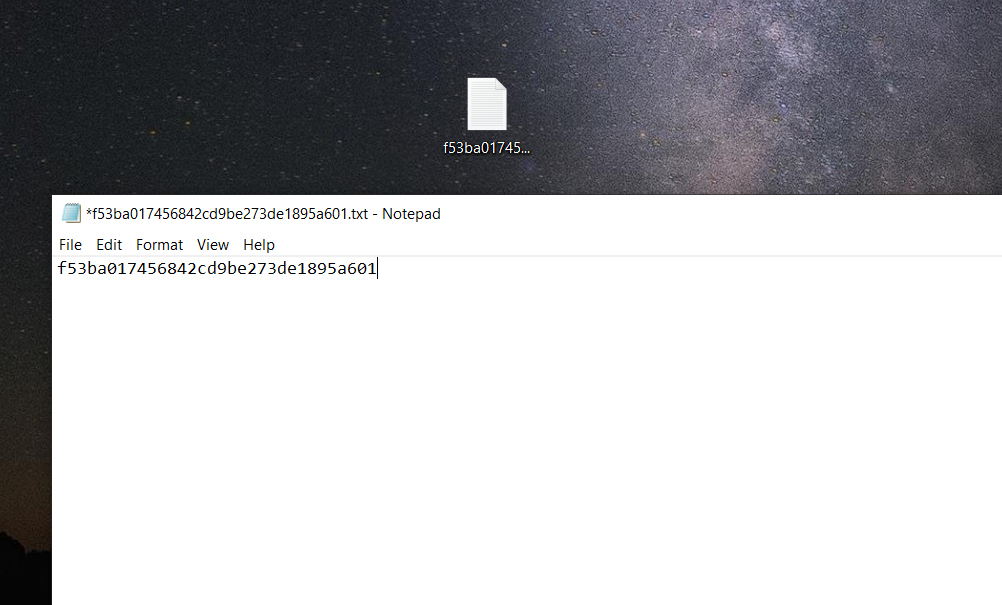
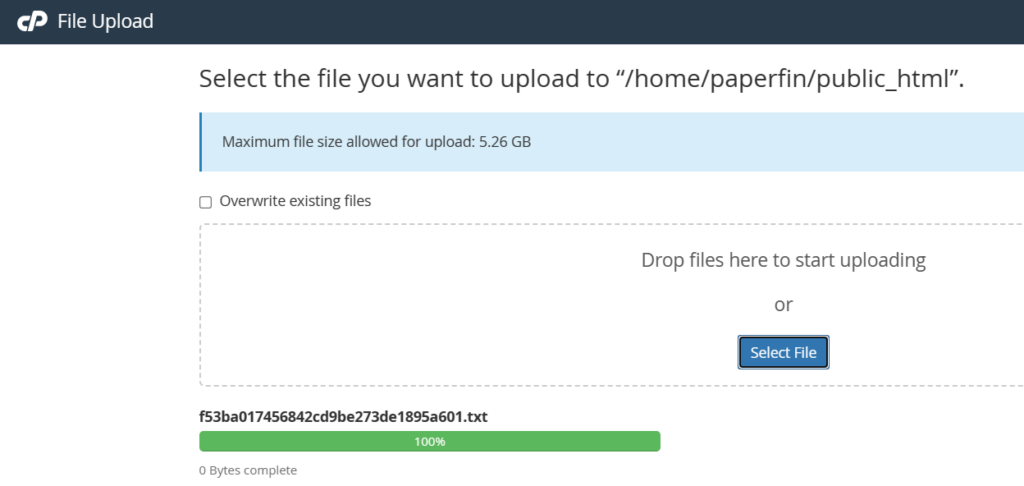
The solution is to: manually add the text file containing the API key to the root of your website. Here’s how to do it:
1. Create a text file. The name of your text file should be: [your_api_key].txt. It’s very important that your file name contains your API key.
2. Next, add the API key to the text file. DO NOT include anything else in the file, such as additional characters, symbols or spaces.
3. Finally, upload the text file to the root of your website. For this, you can use an FTP client or cPanel’s File Manager.
In order to log onto a server using FTP, you first need to gather the necessary information:
the FTP credentials (username and password),
the address of the FTP server,
and the document root director.
Once you’ve collected the necessary information, you will be able to connect to your server using an FTP client such as WinSCP (download WinSCP for free here).
Make sure that all your information is entered correctly. Then press the “Login” button to connect to your server.
Once you’ve completed this step, you can upload the text file which contains your API key. To do this:
open the local folder on your computer, where the text file containing the API key was saved.
open the remote site folder (the folder on your server where your site is located). Usually, it’s the “public_html” folder.
Making sure that both the local and the remote folders are open, select the text file and click on the Upload button to upload the .
The file will begin uploading right away, and once you see it in the remote site folder, you’re all done!
By following these steps, you will be able to access the IndexNow API key from its location and search engines will be able to crawl the key file to verify site ownership.
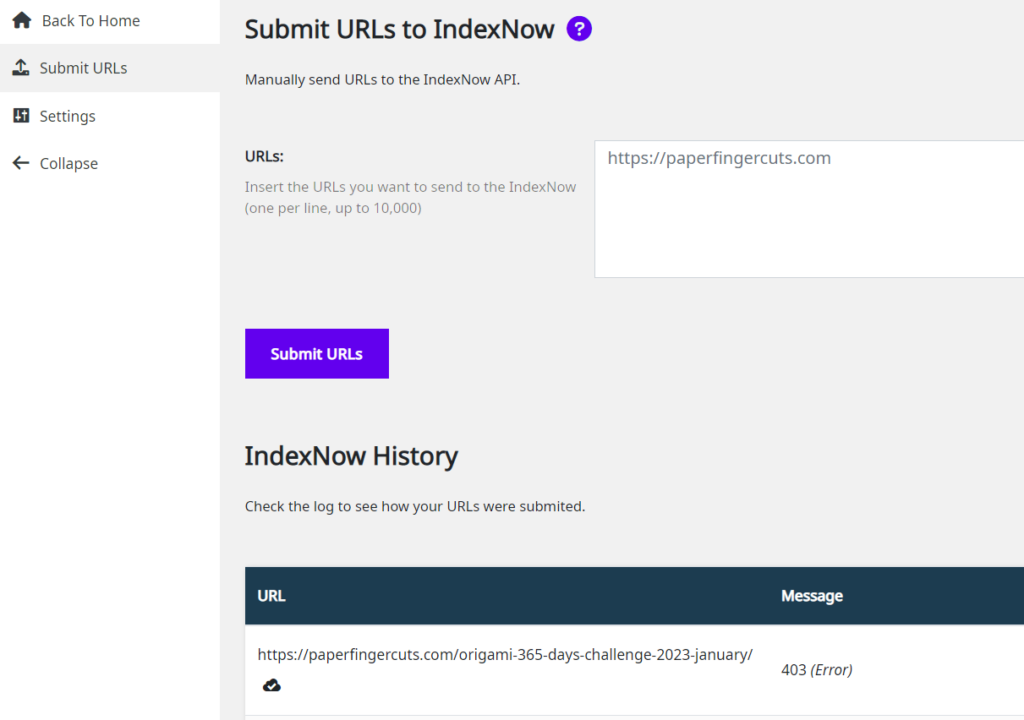
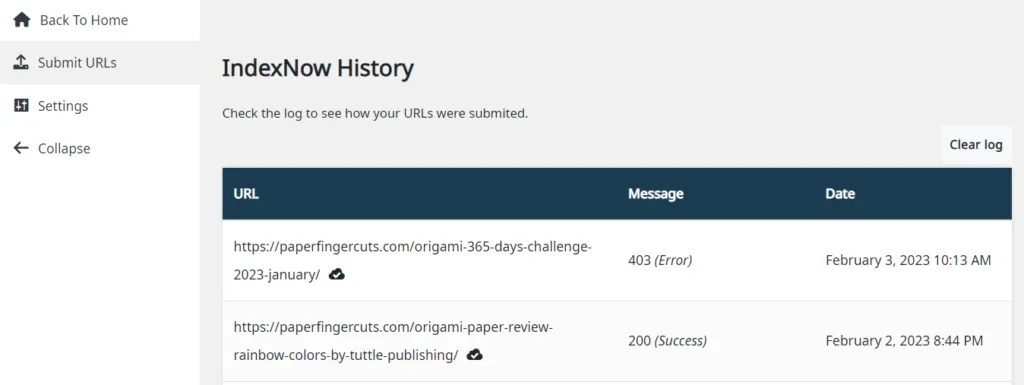
Check that your URLs are being sent to the IndexNow API in IndexNow History
To access the IndexNow History section, go to: Squirrly SEO > IndexNow > Submit URLs
With IndexNow History, we’ve made it extremely easy for you to check that your URLs are being sent to the IndexNow API so that they can be promptly indexed.
In the IndexNow History section, Squirrly SEO displays a list of the most recent URLs that have been submitted to the IndexNow API, as well as the response code associated to each submission.
Here is the full list of response codes and what each one of them means:
HTTP CODE
RESPONSECODE
DESCRIPTION
200
Success
The URL has been successfully submitted to the IndexNow API.
202
Accepted
The IndexNow API received your URL. However, it still needs to validate the API key to confirm the URL belongs to your site.
400
Bad Request
The URL was not properly formatted.
403
Forbidden
The IndexNow API did not find your API key and cannot confirm the URL belongs to your site.
422
Unprocessable Entity
The URL belongs to another site and cannot be processed.
429
Too Many Requests
The IndexNow API received too many requests beyond the permitted quota of 10,000 requests per HTTP POST.
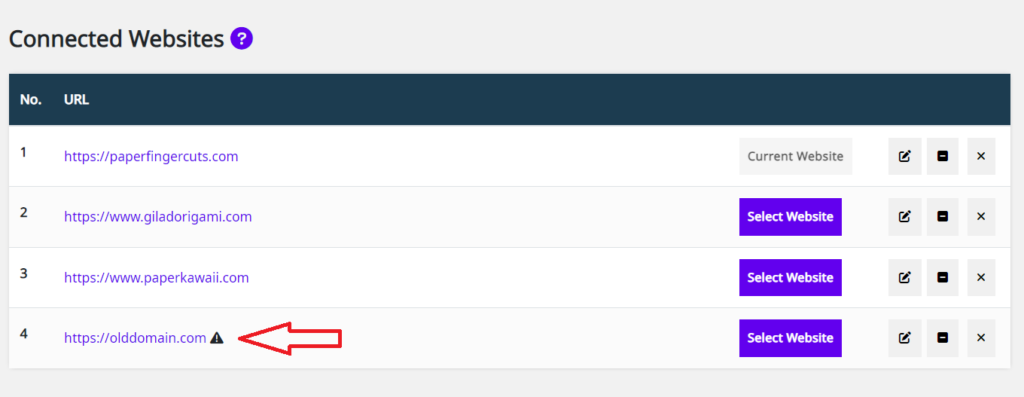
What Causes the Exclamation Mark in the Connected Websites dashboard of the Squirrly Cloud App?
In case you have multiple websites on which you use Squirrly SEO, you can easily add them to the list of Connected Websites in the Squirrly Cloud App (shown below) following the steps from this article.
In some instances, a domain that has been connected to the Squirrly Cloud can get an exclamation mark in the Connected Websites dashboard of the Squirrly Cloud App.
Keep reading to learn more about what causes this and what to do in case this happens to you.
What Causes an Added Domain to Get Exclamation Mark inside the Cloud App?
This issue is linked to the fact that the connection of a site to the Squirrly Cloud App is done via token and NOT via URL. Therefore, when a user clones a WordPress site to another domain name, here is what happens:
User connects domain1.com to the Cloud App (cloud.squirrly.co)
domain1.com – Squirrly URL Token 1
User clones the existing WordPress site and moves it to a new domain name.
domain2.com – Squirrly URL Token1
When domain1.com gets changed to domain2.com inthe Settings > General option in WordPress, the Cloud App will receive a different domain based on the same token, which leads to a matching error.
Squirrly URL Token1 – domain1.com or domain2.com ?
In this situation, Squirrly Cloud will alert you that the domain name is changed but the URL Token is not.
Solution:
If a site is cloned to another domain name, the new domain name will have the same URL Token as the site it was cloned from (domain1.com), and the URL Token needs to be changed in WordPress.
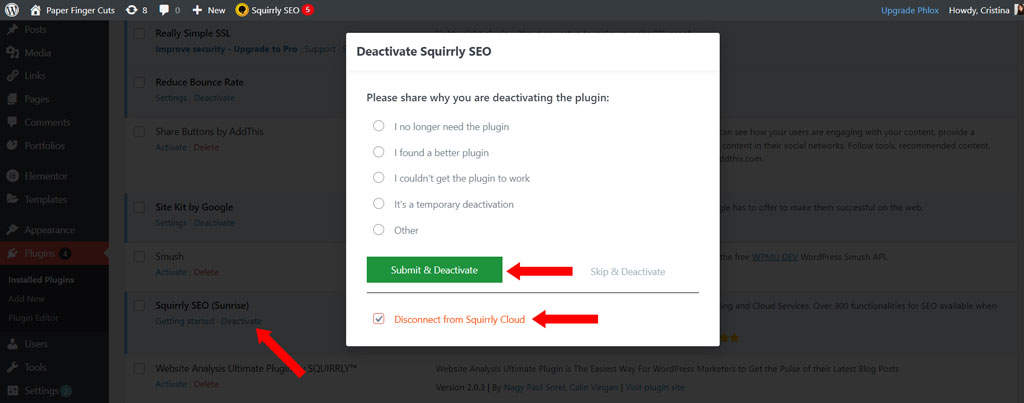
The solution is to go on WordPress dashboard (on the clonned website) and to deactivate Squirrly SEO with the option to disconnect from Cloud. Reactivate Squirrly SEO and connect the website to Cloud again using the same account.
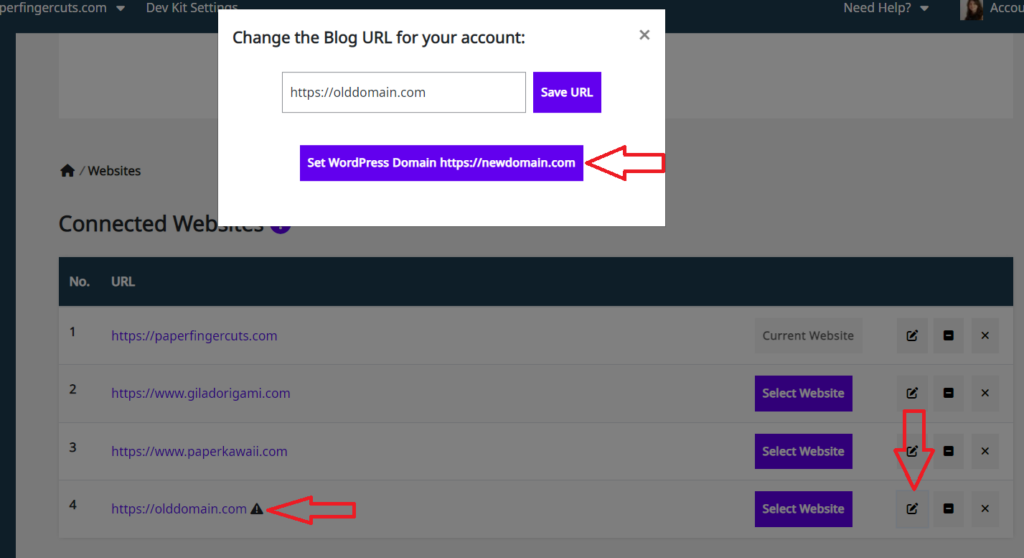
If you changed your domain name from WordPress Settings > General and you want to update the data on Squirrly Cloud to match the domain, click on the Edit icon and then click on the Set WordPress Domain button.
This process will update the domain name on Squirrly Cloud for all Focus Pages, Optimization, Rankings, etc.
How to Include Web Stories in Your Sitemap using Squirrly
Web Stories are a web-based version of the popular Story format that you’ve probably seen on social media sites.
They are a visual storytelling format for the web, which makes it possible to create tappable, visual narratives that blend video, audio, images, animation and text.
You can use this storytelling tool on your own WordPress website to reach more people and engage your audience (Google supports Web Stories, so people can find your published stories across Google Search, Google Discover, and Google Images).
To make it easier for Google to discover your Web Stories, it’s important to include this post type in your sitemap.
In this short tutorial, we’re going to show exactly how to do this using Squirrly. Let’s get to it!
STEP 1: Install a plugin that allows you to easily create Web Stories
Its drag-and-drop editor makes it easy to create beautiful stories – without any coding involved.
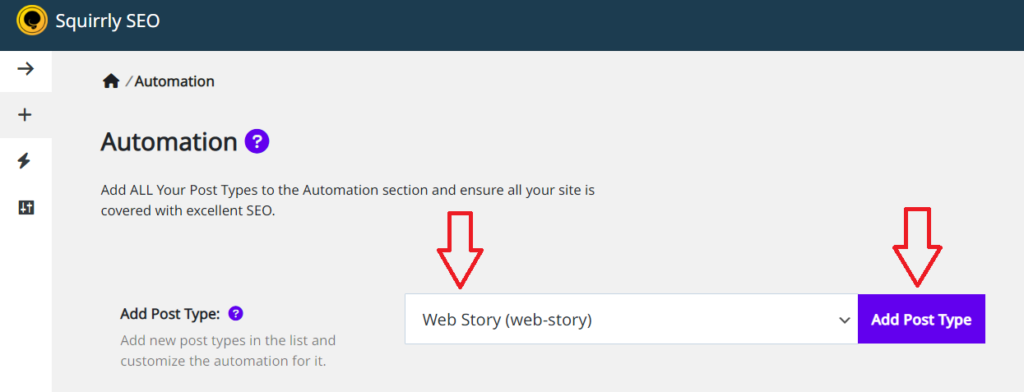
STEP 2: Go to Squirrly SEO > Automation
Then go to Add Post Type and add Web Story (web-story) as a new post type for SEO Automation.
(as shown in the screenshot below)
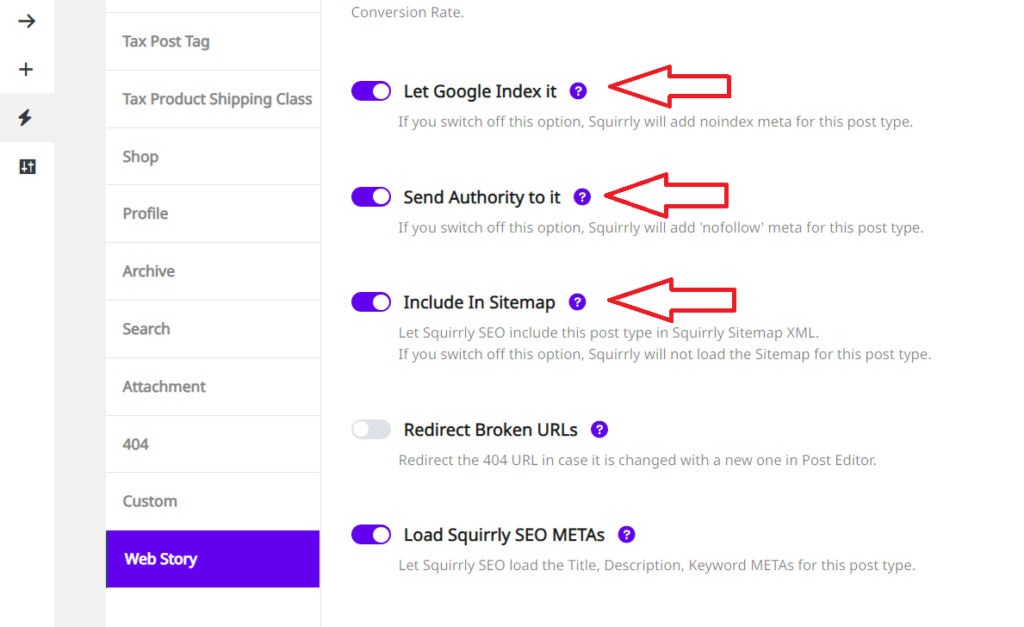
STEP 3: Make sure the Web Story Post Type is included in the Sitemap
For this, you need to go to Squirrly SEO > Automation > Configuration.
Select Web Story as your post type and make sure the following options are turned ON:
Let Google Index it
Send Authority to it
Include In Sitemap
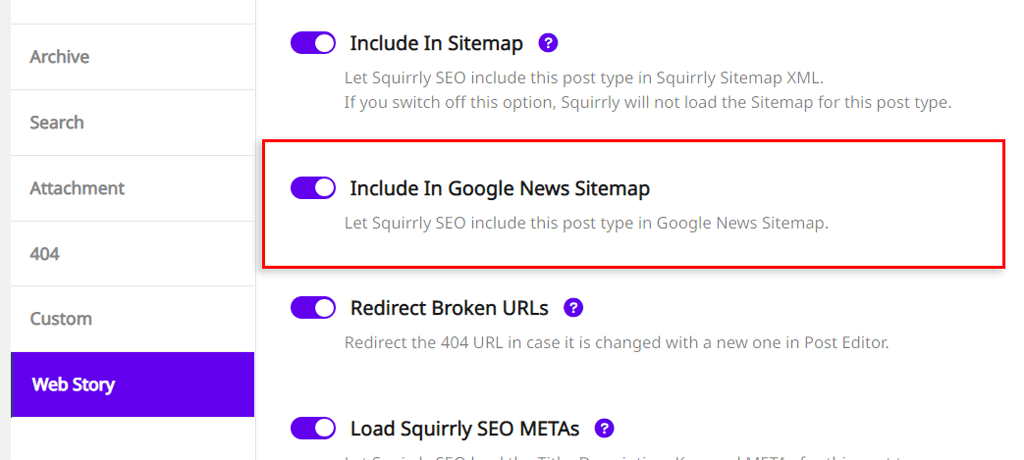
If you want the Web Story Post Type to also be added in Google News Sitemap (essential for appearing in Google News), make sure that the option: Include in Google News Sitemap is also turned ON.
(as shown in the screenshot below)
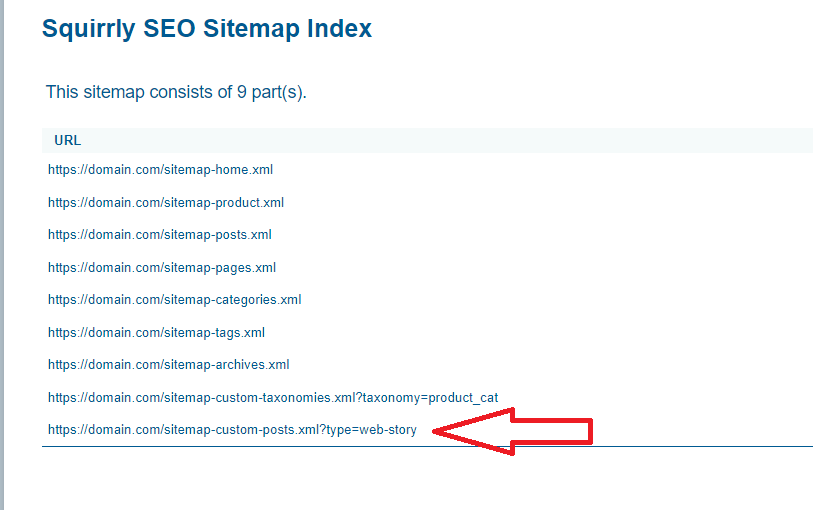
STEP 4: Go to Squirrly SEO > SEO Configuration > Tweaks and Sitemaps > Sitemap XML
Activate the following options for Custom Post Types:
Custom Taxonomies
Custom Posts
(as shown in the screenshot below)
Don’t forget to save your settings!
☑️That’s it!
By following these steps, you can successfully include Stories in your sitemap using Squirrly.