Web Dev Kit – All Plugin Customization Options Explained

The Web Dev Kit allows you to customize Squirrly SEO and install it on your clients’ sites.
We’ve created the Web Dev Kit for Co-Branding Capabilities, but also as a B I G request from agencies and developers who really wanted to offer their customers the absolute best – while also being able to install the plugin and monitor the clients from a single account.
Please take a look at this page – in the section where we compare the Web Dev Kit to the classic Agency plan we sell – for more details.
It’s important to note that the Web Dev Kit is NOT a white-label solution. As mentioned above, it is meant to provide co-branding capabilities (partial customization options).
The Web Dev Kit features are for co-branding only, NOT for completely removing Squirrly branding.
It wouldn’t be useful to agencies anyway, because customers would not believe an agency has sufficient manpower and talent to build algorithms for machine learning and do the kind of big data analysis that Squirrly does, so it’s good that they know Squirrly is the data provider and your agency is the one implementing the service for them.
Also, even if they see our pricing page, they will notice managed services for account licenses are over 1,000 USD. (whiteglove+license)
You’re basically giving your clients’ a customized version of a premium SEO plugin that would cost many thousands of dollars and years to develop if it was exclusive.
The purpose of the Web Dev Kit is to help agencies with:
- creating interesting customizations for their clients;
- remove their access for the Cloud App;
- make easy pre-configured zip files to customize the Squirrly SEO experience for end-users;
- remove client access when the end-user is no longer a client;
- and mainly to be able to easily manage the installs for their clients.
The Web Dev Kit is created for Developers and Agencies, and enables you to:
- customize the plugin,
- limit end-user access to Squirrly SEO functionality,
- customize credit limits for each website connected to your account,
- remove the option for the user to perform certain actions.
This is done by enabling or disabling different settings via a dedicated Customization Panel and a Limits & Packages Panel.
A quick look at how it all works:
1️⃣ Once you activate the Web Dev Kit for your account, you will be able to access the panel with all the available customization options from your Squirrly SEO Cloud account.
Click on Dev Kit Settings to reach the Customization Panel.
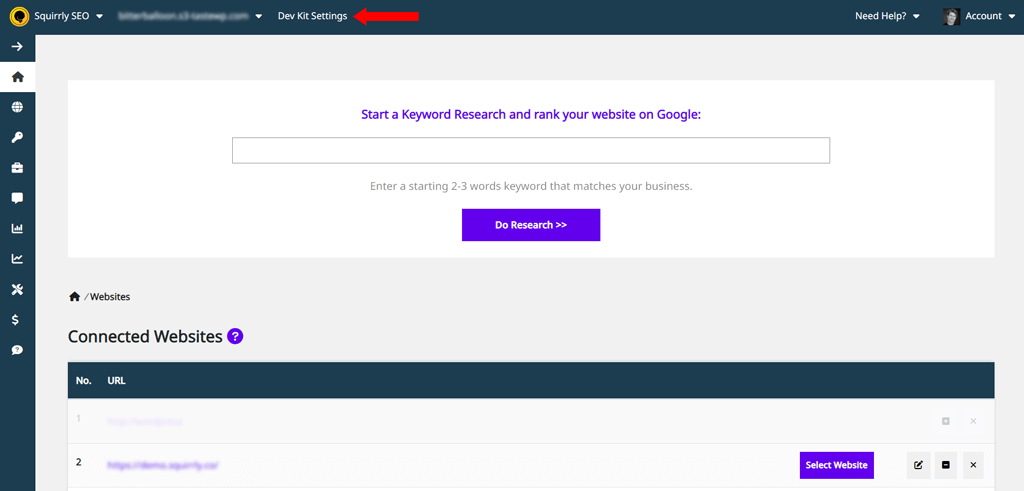
If you’ve successfully activated the Web Dev Kit for your account, you will also be able to access the Customization Panel at the link below (requires you to be logged in to your account)
https://cloud.squirrly.co/user/devkit
This is how the Web Dev Kit Customization Panel Looks Like:

2️⃣ The next step is to go through every item inside the Customization Panel and customize by enabling/disabling options based on your preferences and needs for that particular client/project.
We’ll go through every item listed in the Customization Panel later on in this article. This way, you’ll know exactly what each of the settings available here does and how it translates into actual plugin changes.
You enable an option by sliding the toggle right and disable it by sliding the toggle left.

3️⃣Click on the Save DevKit Options button in order to save the settings you’ve made in the previous step.

4️⃣ Once you’ve saved the desired configurations and the Squirrly SEO plugin is customized, you can go to the Download section an click on the Download button shown in the screenshot below.
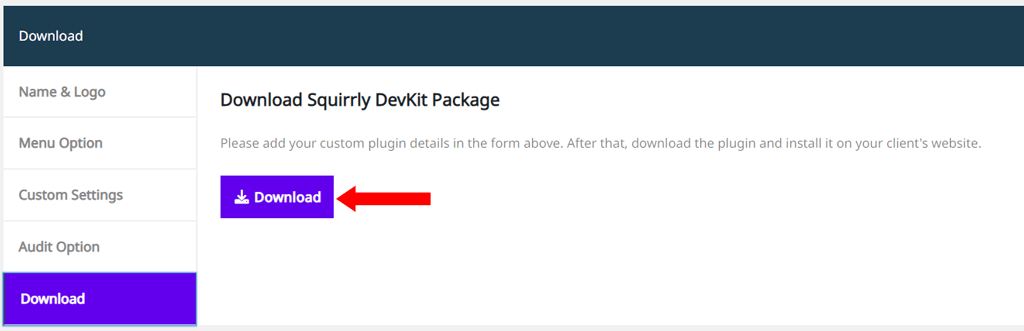
5️⃣ Clicking on the Download button will initiate the download process and you can simply save the ZIP file to your computer.

6️⃣ The final step is to manually upload Squirrly SEO (the customized ZIP file) to your client’s website.
Go to Plugins > Add New

Then click on Upload Plugin and add the ZIP file from your computer by clicking on the Choose File button. Click on Install Now next.

After the upload is complete, click on: Activate Plugin.

The downloaded plugin (ZIP file) will reflect all the configurations/settings you’ve made within the Web Dev Kit Customization Panel.
End-users can start using Squirrly SEO, without having to create or login to any account. Your ZIP file takes care of that.
It’s also important you know that:
Once you add Squirrly SEO to a client’s site, it’s connected to our normal branch.
What this means is:
Once you’ve added a ZIP file to one of your clients, you don’t need to re-upload the ZIP file when there is an updated version available.
After you upload the ZIP file, you can receive automatic updates via the WordPress backend. So, you’ll be able to update the plugin to the latest version directly without re-installing the zip.
Once installed, simply clicking on the Update Now button from the Plugins list is enough to update Squirrly. (as shown in the image below)

IMPORTANT TO KNOW!
Using the Web Dev Kit, you are able to set these settings individually for each project or client, as you can have multiple ZIP files that you can generate and install.
This gives you a lot of flexibility to configure Squirrly SEO differently based on each project or customer.
Next up, we’ll go through ALL the configurations you can make using the Web Dev Kit, how to enable them, and what type of customization each one of them activates.
At the very top of the Customization Panel, you’ll see the following options.
- Plugin Logo URL
- Plugin Name
- Plugin Menu Name
These configurations allow you to customize the way your customers (end-users) see our product.
Here’s what type of customization each one of these options enables.
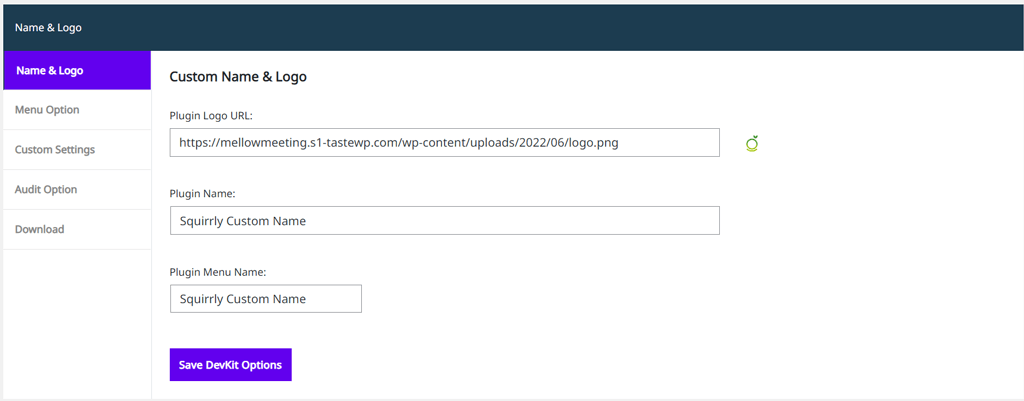
Plugin Logo URL
- To reach this section, go to: Squirrly SEO Cloud App > Dev Kit Settings > Name & Logo
This option allows you to customize the Logo that appears alongside the Squirrly SEO Plugin.
All you need to do is place the custom logo you want (link to an image) in the dedicated field. As shown in the example below:
🚨 The default WordPress size of the logo is 200px width and 200px height, so we recommend using this size for the custom Web Dev Kit logo.
Once you save the settings and install the ZIP file on a client’s site, the custom Logo URL you’ve linked to in this section of the Customization Panel will appear in the following sections:
- WordPress Admin Menu
- WordPress Admin Toolbar
See an example in the image below.

Plugin Name
- To reach this section, go to: Squirrly SEO Cloud App > Dev Kit Settings > Name & Logo
This option allows you to partially customize the plugin’s name, as it appears in the “Plugins” section of WordPress.
Simply write down the custom name (exactly how you want it to appear) in the dedicated field. As shown in the example below:

Once you save the settings and install the ZIP file on a client’s site, the name you’ve written down here will show in the following sections:
- “Plugins” section of WordPress (see an example below)
Squirrly SEO must be activated on a client’s site in order for the modifications to take effect.

! The By Squirrly mention that is also visible in the image above can NOT be modified, as the Web Dev Kit is meant to provide co-branding capabilities and is NOT a white-label solution.
Plugin Menu Name
- To reach this section, go to: Squirrly SEO Cloud App > Dev Kit Settings > Name & Logo
This option allows you to customize the plugin’s name, as it appears in the WordPress Admin menu and the WordPress Admin Toolbar.
Simply write down the custom name (exactly how you want it to appear) in the dedicated field. As shown in the example below:

Once you save the settings and install the ZIP file on a client’s site, the plugin menu name you’ve written down here will show in the following sections:
- WordPress Admin Menu
- WordPress Admin Toolbar
See an example below:
Now, sliding over to the Menu Option settings, you’ll see the following items:
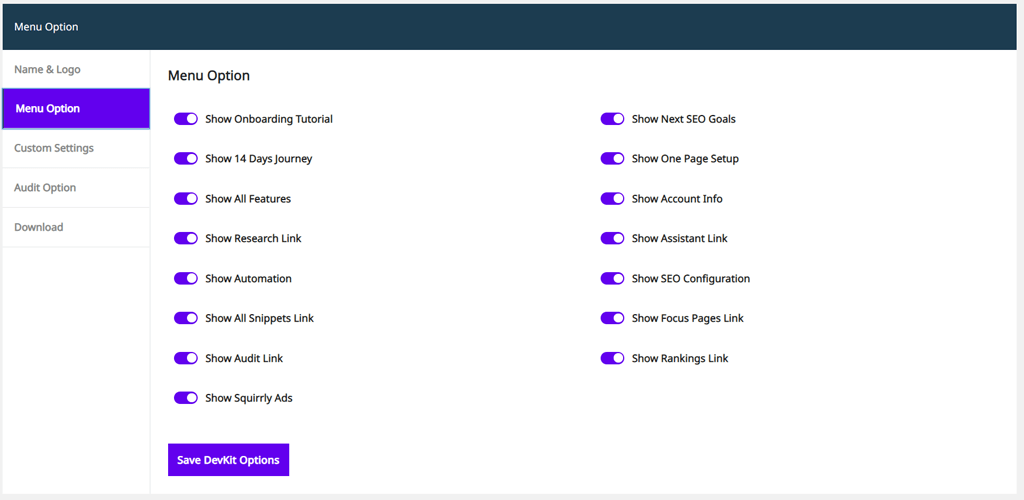
!! The settings under Menu Option in Web Dev Kit will NOT completely remove the functionality of a specific feature.
With these options, we’ve made it possible for certain features NOT to be visible in the Squirrly Menu and in key areas of the plugin (such as the All Features section – Squirrly SEO > All Features).
So, for example, if a user reaches the Keyword Research section of Squirrly (other than by using the Menu navigation buttons or the All Features section), the Research features will still work.
More details about this and what each item from the Menu Option enables you to do coming up next.
1. Show Onboarding Tutorial
- To reach this section, go to: Squirrly SEO Cloud App > Dev Kit Settings > Menu Option
This option allows you to choose whether or not to show Squirrly’s onboarding pop-up.
If enabled, the onboarding tutorial pop-up will appear automatically after Squirrly SEO is activated and is meant to assist users in setting up Squirrly SEO for their site.
If you choose NOT to activate this option, the onboarding tutorial pop-up won’t appear for end-users. So, if you want to limit your clients’ access to Squirrly’s onboarding tutorial, you should turn the option Show Onboarding Tutorial OFF.
Here is what end-users will see when the option Show Onboarding Tutorial is ON

Here is what end-users will see when the option Show Onboarding Tutorial is OFF

^^ As you can see, the pop-up is no longer visible.
2. Show 14 Days Journey
- To reach this section, go to: Squirrly SEO Cloud App > Dev Kit Settings > Menu Option
The 14 Days Journey to Better Ranking gives users access to a 14-lessons course that can be accessed within the plugin.
By following the guidance provided in each one of the lessons, users learn how to improve the rankings for one of their Focus Pages in just 14 Days by using the plugin.
With this option, you can either enable or disable your clients from accessing the 14 Days Journey from within the plugin.
Here is how Squirrly’s interface will look like:
- Overview Section – when the option Show 14 Days Journey is Enabled

- Overview Section – when the option Show 14 Days Journey is Disabled

^^ As you can see, the panel that gave access to the 14 Days Journey lessons is missing.
- All Features Section – when the option Show 14 Days Journey is Enabled

- All Features Section – when the option Show 14 Days Journey is Disabled

^^ As you can see, the section from where the 14 Days Journey to Better Rankings can be accessed has been removed from the interface.
3. Show One Page Setup
- To reach this section, go to: Squirrly SEO Cloud App > Dev Kit Settings > Menu Option
The One Page Setup experience is meant to helps users get pages, keywords and data inside many important sections of Squirrly SEO, so that everything becomes easier for the user.

With this option, you can either enable or disable your clients from accessing the One Page Setup from within the plugin.
Here is what end-users will see in the:
- Overview Section when the option Show One Page Setup is Enabled

- Overview Section when the option Show One Page Setup is Disabled

^^ As you can see, the sidebar item that gave access to the One Page Setup section is missing.
Having the option Show One Page Setup disabled will also result in having the navigation item All Features removed from the WordPress Admin Menu.

Having the option Show One Page Setup disabled will also result in having the navigation item One Page Setup removed from the toolbar (shown below).

4. Show All Features
- To reach this section, go to: Squirrly SEO Cloud App > Dev Kit Settings > Menu Option
The All Features section of Squirrly provides a quick view at some of the key features from Squirrly, and also enables users to access, as well as activate and deactivate certain features / modules available in Squirrly.
With this option, you can either enable or disable your clients from accessing the All Features section from within the plugin.
Here is what end-users will see in the:
- Overview Section when the option Show All Features is Enabled

- Overview Section when the option Show All Features is Disabled

^^ As you can see, the sidebar item that gave access to the All Features section is missing.
Having the option Show All Features disabled will also result in having the navigation item All Features removed from the WordPress Admin Menu.

Having the option Show All Features disabled will also result in having the navigation item All Features removed from the toolbar (shown below).

NOTE! You can also hide certain features from showing in the All Features section individually – without needing to hide the entire All Features section. For example: disabling the Show 14 Days Journey option using the Web Dev Kit will also remove it from the All Features section.
5. Show Account Info
- To reach this section, go to: Squirrly SEO Cloud App > Dev Kit Settings > Menu Option
This option allows you to remove end-user access to your Account info details.
Having this option turned OFF means you will no longer have to worry that your clients will see your account information (including plan information and email address connected to the account).
Here is what end-users will see in the:
- Overview Section when the option Show Account Info is Enabled

- Overview Section when the option Show Account Info is Disabled

^^ As you can observe, the panel that showed the Account Info and the plan limits has been completely REMOVED from the interface.
NOTE!
Having the option Show Account Info disabled will also result in having the navigation item Account Info removed from the WordPress Admin Menu.

6. Show Research Link
- To reach this section, go to: Squirrly SEO Cloud App > Dev Kit Settings > Menu Option
This option allows you to limit end-user access to the Research section of Squirrly, where users can do things like:
- perform keyword research to find the best keywords their sites can rank for;
- access the Briefcase feature;
- organize and group keywords using Labels;
- see keyword suggestions;
- access their keyword research history for the past 30 Days.
Here is what end-users will see in the:
- Squirrly’s Navigation Menu when the option Show Research Link is Enabled

- Squirrly’s Navigation Menu when the option Show Research Link is Disabled

^^ As you can see, the Menu Item that links to the Research section of Squirrly is no longer Visible.
NOTES!
Having the option Show Research Link disabled will also result in having the item Keyword Research removed from the Navigation Bar.

Having the option Show Research Link disabled will also result in having the Keyword Research item removed from the toolbar (shown in the screenshots below).

Having the option Show Research Link disabled will also result in having the panel Keyword Research removed from the All Features section.

7. Show Automation Link
- To reach this section, go to: Squirrly SEO Cloud App > Dev Kit Settings > Menu Option
This option allows you to limit end-user access to Squirrly’s SEO Automation features.
Here is what end-users will see in:
- Squirrly’s Navigation Menu when the option Show Automation Link is Enabled

- Squirrly’s Navigation Menu when the option Show Automation Link is Disabled

^^ As you can see, the Menu Item that links to the Automation section of Squirrly is no longer Visible in the Menu.
NOTE!
Having the option Show Automation Link disabled will also result in having the item Automation removed from the Navigation Bar.

Having the option Show Automation Link disabled will also result in having the Automation item removed from the toolbar (shown in the screenshot below).

Having the option Show Automation Link disabled will also result in having the panel SEO Automation removed from the All Features section.

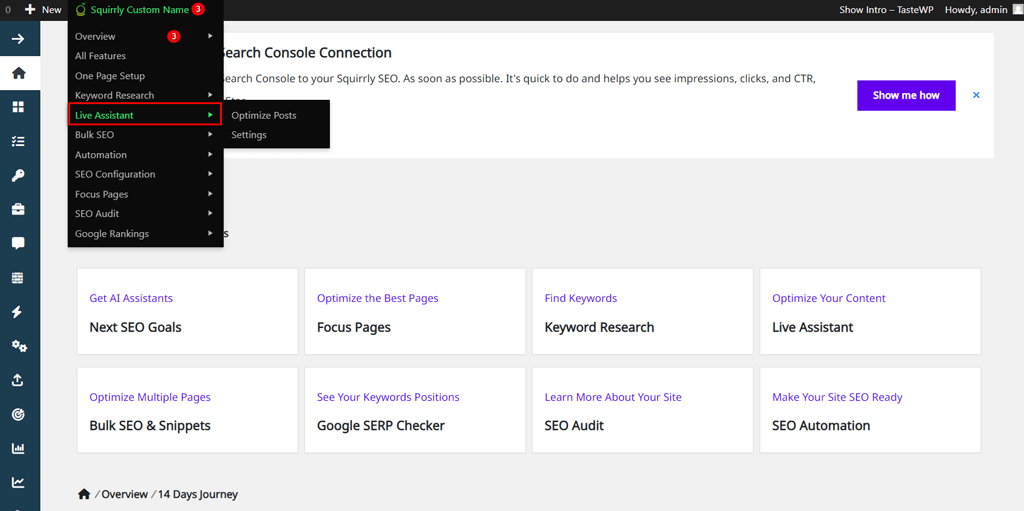
8. Show Assistant Link
- To reach this section, go to: Squirrly SEO Cloud App > Dev Kit Settings > Menu Option
This option allows you to limit end-user access to Squirrly’s SEO Live Assistant feature.
Here is what end-users will see in:
- Squirrly’s Navigation Menu when the option Show Assistant Link is Enabled

- Squirrly’s Navigation Menu when the option Show Assistant Link is Disabled

^^ As you can see, the Menu Item that links to the Live Assistant section of Squirrly is no longer Visible in the Menu.
NOTE!
Having the option Show Assistant Link disabled will also result in having the item Live Assistant removed from the Navigation Bar.

Having the option Show Assistant Link disabled will also result in having the Live Assistant item removed from the toolbar (shown in the screenshot below).
Having the option Show Assistant Link disabled will also result in having the panel Live Assistant removed from the All Features section.

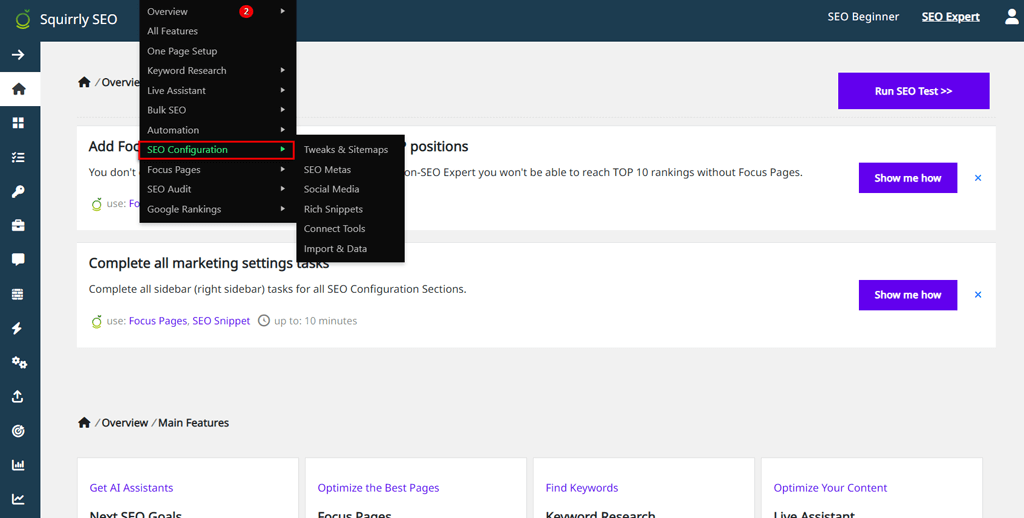
9. Show SEO Configuration Link
- To reach this section, go to: Squirrly SEO Cloud App > Dev Kit Settings > Menu Option
This option allows you to limit end-user access to the SEO Configuration section of Squirrly.
Here is what end-users will see in:
- Squirrly’s Navigation Menu when the option Show SEO Configuration Link is Enabled

- Squirrly’s Navigation Menu when the option Show SEO Configuration Link is Disabled

^^ As you can see, the Menu Item that links to the SEO Configuration section of Squirrly is no longer Visible.
NOTES!
Having the option Show SEO Configuration Link disabled will also result in having the item SEO Configuration removed from the Navigation Bar.

Having the option Show SEO Configuration Link disabled will also result in having the SEO Configuration item removed from the toolbar (shown in the screenshot below).
10. Show All Snippets Link
- To reach this section, go to: Squirrly SEO Cloud App > Dev Kit Settings > Menu Option
This option allows you to limit end-user access to Squirrly’s Bulk SEO feature.
Here is what end-users will see in:
- Squirrly’s Navigation Menu when the option Show All Snippets Link is Enabled

- Squirrly’s Navigation Menu when the option Show All Snippets Link is Disabled

^^ As you can see, the Menu Item that links to the Bulk SEO section of Squirrly is no longer Visible in the Menu.
NOTE!
Having the option Show All Snippets Link disabled will also result in having the item Bulk SEO removed from the Navigation Bar.

Having the option Show All Snippets Link disabled will also result in having the Bulk SEO item removed from the toolbar. (shown in the screenshot below)

Having the option Show All Snippets Link disabled will also result in having the panel Bulk SEO&Snippets removed from the All Features section.

11. Show Focus Pages Link
- To reach this section, go to: Squirrly SEO Cloud App > Dev Kit Settings > Menu Option
This option allows you to limit end-user access to Squirrly’s Focus Pages feature.
Here is what end-users will see in:
- Squirrly’s Navigation Menu when the option Show Focus Pages Link is Enabled

- Squirrly’s Navigation Menu when the option Show Focus Pages Link is Disabled

^^ As you can see, the Menu Item that links to the Focus Pages section of Squirrly is no longer Visible in the Menu.
NOTE!
Having the option Show Focus Pages Link disabled will also result in having the item Focus Pages removed from the Navigation Bar.

Having the option Show Focus Pages Link disabled will also result in having the Focus Pages item removed from the toolbar. (shown in the screenshot below)

Having the option Show Focus Pages Link disabled will also result in having the panel Focus Pages removed from the All Features section.

12. Show Audit Link
- To reach this section, go to: Squirrly SEO Cloud App > Dev Kit Settings > Menu Option
This option allows you to limit end-user access to Squirrly’s SEO Audit Suite feature.
Here is what end-users will see in:
- Squirrly’s Navigation Menu when the option Show Audit Link is Enabled

- Squirrly’s Navigation Menu when the option Show Audit Link is Disabled

^^ As you can see, the Menu Item that links to the SEO Audit section of Squirrly is no longer Visible in the Menu.
NOTE!
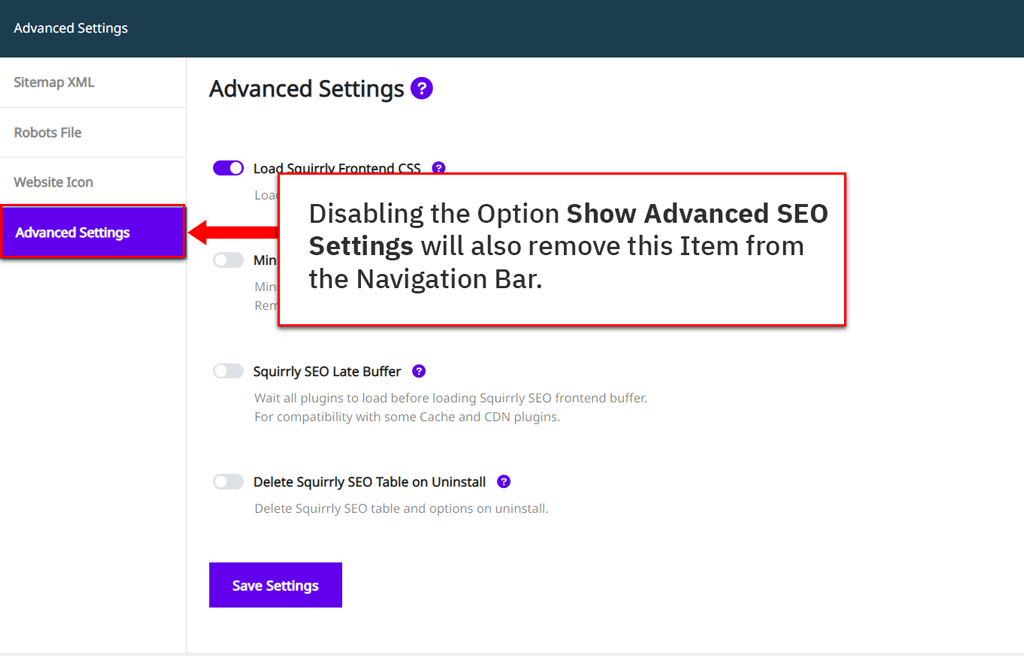
Having the option Show SEO Audit Link disabled will also result in having the item SEO Audit removed from the Navigation Bar.

Having the option Show SEO Audit Link disabled will also result in having the SEO Audit item removed from the toolbar. (shown in the screenshot below)

Having the option Show Audit Link disabled will also result in having the panel SEO Audit removed from the All Features section.

13. Show Rankings Link
- To reach this section, go to: Squirrly SEO Cloud App > Dev Kit Settings > Menu Option
This option allows you to limit end-user access to Squirrly’s Rankings feature.
Here is what end-users will see in:
- Squirrly’s Navigation Menu when the option Show Rankings Link is Enabled

- Squirrly’s Navigation Menu when the option Show Rankings Link is Disabled

^^ As you can see, the Menu Item that links to the Google Rankings section of Squirrly is no longer Visible in the Menu.
NOTE!
Having the option Show Rankings Link disabled will also result in having the item Google Rankings removed from the Navigation Bar.

Having the option Show Rankings Link disabled will also result in having the Google Rankings item removed from the toolbar. (shown in the screenshot below)

Having the option Show Rankings Link disabled will also result in having the panel Google Rankings with GSC removed from the All Features section.

14. Show Next SEO Goals
- To reach this section, go to: Squirrly SEO Cloud App > Dev Kit Settings > Menu Option
This option allows you to remove end-user access to the Next SEO Goals feature.
Here is what end-users will see in:
- Overview section when the option Show Next SEO Goals is Enabled

- Overview section when the option Show Next SEO Goals is Disabled

^^ As you can see, the entire section showing the Next SEO Goals is no longer visible.
NOTE!
Having the option Show Next SEO Goals disabled will also result in having the panel Next SEO Goals removed from the All Features section.

15. Show Squirrly Ads
- To reach this section, go to: Squirrly SEO Cloud App > Dev Kit Settings > Menu Option
This option allows you to choose whether or NOT to allow for Squirrly ads to be displayed.
By disabling this option, you make sure end users won’t see any ADS (promotional messages) from our company inside the plugin or WordPress. (except the buttons which appear in case they go over the limits, in which case we suggest them to upgrade).
Custom Settings Option
Next up, we have the Custom Settings Option. Let’s go through every item and see what each of the settings present here helps you achieve.
Important! The Settings Option (active features) will be set in the plugin the same as you set it within the Customization Panel of the Web Dev Kit.
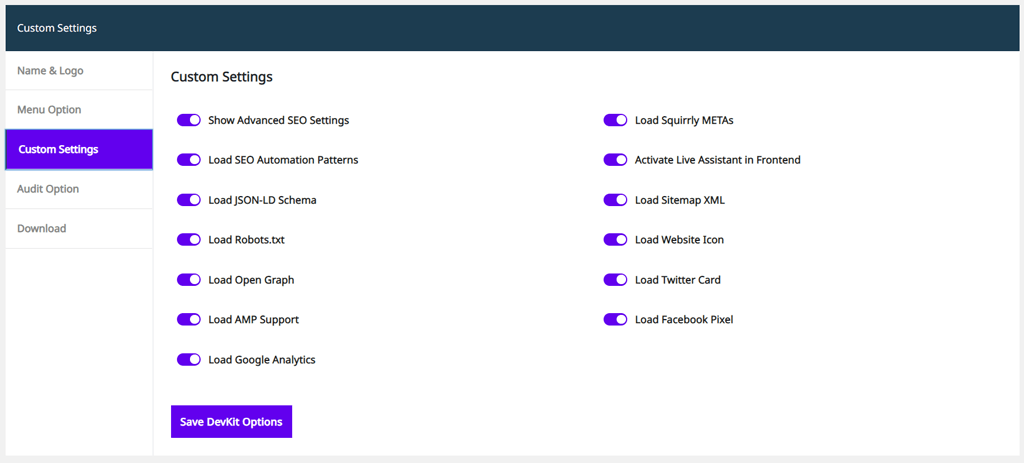
Show Advanced SEO Settings
- To reach this section, go to: Squirrly SEO Cloud App > Dev Kit Settings > Custom Settings

This option allows you to choose whether to show the link to Advanced Settings to end-users or not.

By enabling the option Show Advanced SEO Settings, end-users will be able to navigate to SEO Configuration > Tweaks & Sitemap > Advanced Settings* in order to access the following functionality.
(*when using Squirrly with Expert Mode)
^^ You can learn more about each one of the settings end users can make via the Advanced Settings module here.
By disabling the option Show Advanced SEO Settings, you remove the link to the Advanced Settings module of Squirrly SEO.
Load Squirrly METAs
- To reach this section, go to: Squirrly SEO Cloud App > Dev Kit Settings > Custom Settings

When this option is turned ON, Squirrly SEO will load the Squirrly SEO METAs (everything included in the SEO snippet, excluding: Open Graph and Twitter Card) for the site(s) on which you install it.
Load SEO Automation Patterns
- To reach this section, go to: Squirrly SEO Cloud App > Dev Kit Settings > Custom Settings

When this option is turned ON, Squirrly SEO will load the SEO Automation Patterns for the site(s) on which you install it.
Activate Live Assistant in Frontend
- To reach this section, go to: Squirrly SEO Cloud App > Dev Kit Settings > Custom Settings

When this option is turned ON, Squirrly SEO will activate the SEO Live Assistant in frontend for the site(s) on which you install it. For sites using Elementor or Oxygen, this option should be Activated.
Load JSON-LD Schema
- To reach this section, go to: Squirrly SEO Cloud App > Dev Kit Settings > Custom Settings

When this option is turned ON, Squirrly SEO will load the JSON-LD schema in the website’s source code for the site(s) on which you install it.
Load Sitemap XML
- To reach this section, go to: Squirrly SEO Cloud App > Dev Kit Settings > Custom Settings

When this option is turned ON, Squirrly SEO will add the Sitemap XML by Squirrly for the site(s) on which you install it.
Load Robots.txt
- To reach this section, go to: Squirrly SEO Cloud App > Dev Kit Settings > Custom Settings

When this option is turned ON, Squirrly SEO will add the Robots.txt file (which can be accessed at: root domain/robots.txt) for the site(s) on which you install it.
Load Website Icon
- To reach this section, go to: Squirrly SEO Cloud App > Dev Kit Settings > Custom Settings
When this option is turned ON, Squirrly SEO will load/display the website icon for the site(s) on which you install it.
Load Open Graph
- To reach this section, go to: Squirrly SEO Cloud App > Dev Kit Settings > Custom Settings

When this option is turned ON, Squirrly SEO will load the Squirrly Open Graph tags for the site(s) on which you install it.
Load Twitter Card
- To reach this section, go to: Squirrly SEO Cloud App > Dev Kit Settings > Custom Settings

When this option is turned ON, Squirrly SEO will load the Twitter Card tags for the site(s) on which you install it.
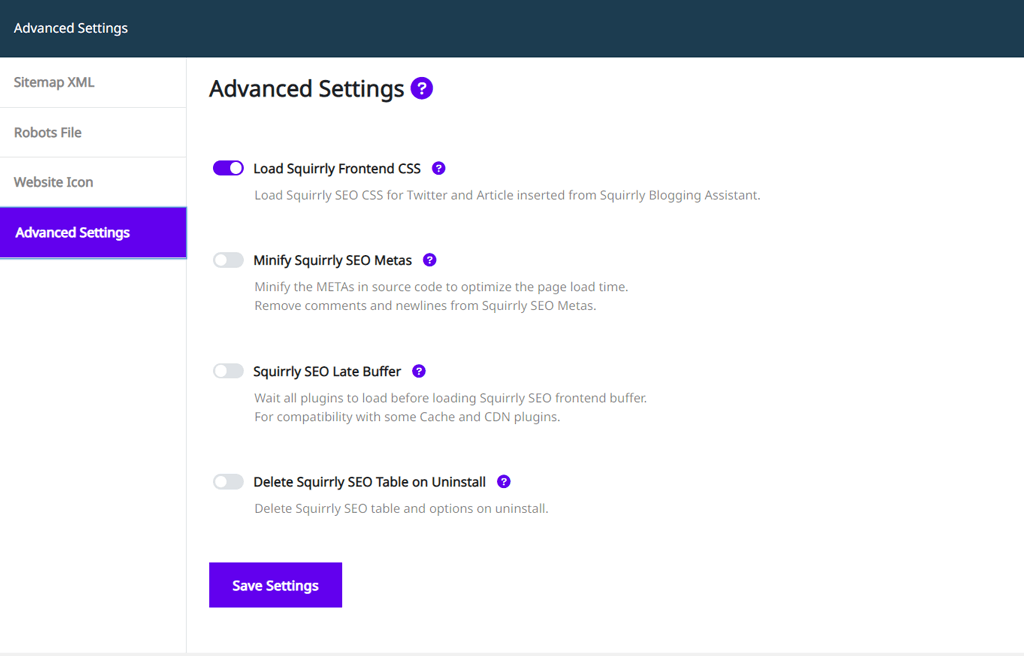
Load AMP Support
- To reach this section, go to: Squirrly SEO Cloud App > Dev Kit Settings > Custom Settings

When this option is turned ON, Squirrly SEO will load the AMP support for the site(s) on which you install it. This is mostly used for Tracking Tools (Google Analytics and Facebook Pixels).
- Squirrly will load the Accelerate Mobile Pages (AMP) support when the AMP for WP or the AMP plugins are detected on your client’s sites, and when the mobile version of the site is detected.
AMP pages are generated differently compared to standard pages, which means the code used on them has to be adapted specifically for AMP.
If you enable this option, Squirrly will load Facebook Pixel and Google Analytics in AMP format which is required for them to load faster.
If you DON’T activate this option, Squirrly will load Facebook Pixels and Google Analytics normally for both mobile and desktop (as it would for the desktop version, without distinguishing between mobile and desktop, even if your client has an AMP plugin installed).
Load Facebook Pixel
- To reach this section, go to: Squirrly SEO Cloud App > Dev Kit Settings > Custom Settings
When this option is turned ON, Squirrly SEO will load Facebook Pixel for the site(s) on which you install it.
Load Google Analytics
- To reach this section, go to: Squirrly SEO Cloud App > Dev Kit Settings > Custom Settings

When this option is turned ON, Squirrly SEO will load Google Analytics for the site (s) on which you install it.
Finally, we have the section: Audit Option.
Here’s how you can use the two options in this section to get repeat business from your clients.
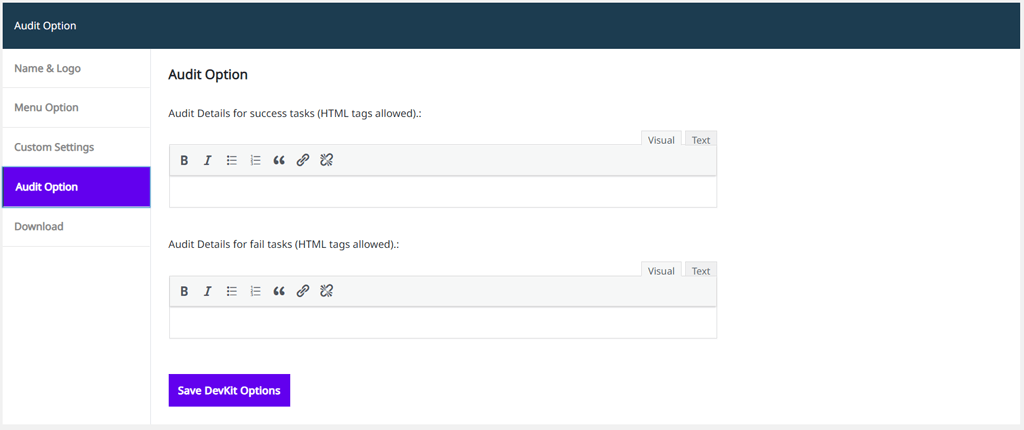
Audit Details for Success Tasks (HTML tags allowed)
- To reach this section, go to: Squirrly SEO Cloud App > Dev Kit Settings > Audit Option
This option allows you to customize the texts that appear for ALL Success types of messages inside the Audit (within the tasks marked GREEN).
Here’s an example:
You can use this option to place Buttons or a call to action to schedule calls with your company for further website enhancement contracts – right inside the SEO Audit from Squirrly.
Audit Details for Fail Tasks (HTML tags allowed)
- To reach this section, go to: Squirrly SEO Cloud App > Dev Kit Settings > Audit Option
This allows you to customize ALL the texts that appear inside the Squirrly SEO Audit for tasks that require attention (the tasks marked RED).
Here’s an example:
Let’s add the text: Need help with this? https://www.florinmuresan.com/ is already ready to help you out! in the Audit Details for fail tasks (HTML tags allowed).

If we were to then save the settings, download the ZIP file, and upload it on a client’s site, here’s how the SEO Audit will look like.

As you can see the message: Need help with this? htttps://www.florinmuresan.com/ is always ready to help you out! appears in the sections of the Audit marked with a red thumbs down.
Inside the SEO Audit – Red indicates problems. Categories that are marked Red require the users’ immediate attention.
So, placing a CTA for the client to reach out to you for help to solve that problem can be a great way to get customers to turn to your services repeatedly.
Important Notes
- The Menu Options will not totally restrict the functionality of a specific feature but, as specified, the features will NOT be visible in the Squirrly Menu.
- What is completely removed so far is the access to the Cloud App once you have the Dev Kit enabled.
- The Settings Option (active features) will be set in the plugin the same as you set it in the Web Dev Kit (using the Customization Panel).
Customize Limits: Limits & Packages
- This feature allows you to customize credit limits for each website connected to your account.
- To reach this option, go to Squirrly SEO Cloud App > Dev Kit Settings > Limits & Packages

Benefits:
Each account with Web Dev Kit can have multiple sites connected to it, and each site can represent a separate client, for example.
With this option, you can add individual DevKit Packages and set specific limits for each site/client for the following features:
- Keyword Research
- Focus Pages
- Audit Pages
- SERP Checker
Adding a New DevKit Package:
- Navigate to your Squirrly SEO Cloud App Dashboard.
- From the list of Connected Websites, click on the “Website Limits & Packages” icon next to the website for which you wish to add a new DevKit Package.

You can also add a new package by navigating to the Squirrly SEO Cloud App > Dev Kit Settings > Limits and Packages and clicking on the “Add Package” button.

Configuring a DevKit Package:

When you create a new DevKit Package, you have the ability to:
- Assign a unique name to the package.
- Set a keyword research limit per website.
- Set a custom Focus Pages limit per website.
- Set a custom Audit Pages limit per website.
- Set a custom SERP Credits limit per website.
🚨 IMPORTANT NOTE! The values that you can set here depend on your Squirrly SEO plan and the corresponding account limits.

Default DevKit Package Option:
When adding a DevKit Package, you can define that package as the Default Package.
- If set to ‘Yes‘, all connected sites without a DevKit package assigned to them will follow the limits of the default DevKit Package. Sites activated before setting this will follow the default DevKit Package if set to ‘Yes’.
- If multiple packages are set to ‘Yes’ for the Default DevKit Package option during the creation of a new package, only the most recent package added with the ‘Yes’ option will be set as default. Only one default can exist.
- If set to ‘No‘, no limits are applied to any site unless you’ve manually created a DevKit package for them.
If you don’t want to have a default DevKit Package and want to manually activate a DevKit Package for every client/website connected to your account, then set this option to ‘No’.
After assigning a DevKit Package to a website, the end user (like a client) will view the package limits in their account info.

NOTE! This is visible only when the “Show Account Info” option is enabled (which you can control from the Menu Option under Dev Kit Settings).
Viewing DevKit Packages:
- To view all DevKit Packages you’ve created for your account, go to Squirrly SEO Cloud App > Dev Kit Settings > Limits and Packages

After setting up DevKit Packages for your account, this section will display the following details:
- Name: Displays the custom name of each DevKit Package.
- Keyword Researches: Shows the custom limit set for keyword researches.
- Focus Pages: Shows the custom limit set for Focus Pages.
- SERP Credits: Shows the custom limit set for the SERP Checker.
- Used: Lists the number of websites using that particular package.
You can also view information regarding DevKit Packages in Squirrly SEO Cloud App > Dashboard.
Here, you can review the websites to which either a default DevKit Package or a custom DevKit Package has been assigned. The assigned package and limit information is conveniently displayed right below each site’s URL.

The details include:
- PK: Package Name
- KR: Limits for keyword researches
- FP: Limits for Focus Pages
- AP: Limits for Audit Pages
- SERP: Limits for SERP Credits.
You can also view this information by clicking on the “Website Limits & Packages” icon next to the desired website.

If no custom DevKit Package is assigned to a site and there’s no default DevKit Package, the “Package Name” field will show “None,” and the displayed limits will be the ones of the account.

Update Assigned Package
To set new limits and assign a new DevKit Package to a connected website, follow these steps:
- Find the desired website in the “Connected Websites” list and click on the corresponding Website Limits & Packages icon.

- Then choose one of the custom DevKit Packages you’ve already created from the drop-down list and click “Set Package” to complete the action.

The displayed limits (keyword researches, Focus Pages, Audit Pages, and SERP Credits) will update to reflect the settings you defined for that specific package.
Please note: After you assign a new DevKit Package, Squirrly will take a couple of minutes to update and show the changes in the end user’s account.
This is visible only if the “Show Account Info” option is turned on for that website. You can manage this setting in the Squirrly SEO Cloud App by navigating to Dev Kit Settings > Menu Option.
Optimization & Stats:
- To access this, go to Squirrly SEO Cloud App > Dashboard

Clicking on the “Optimization & Stats” icon will reveal the following information regarding the associated website:
- Total of Articles Optimized/website
- Total Keyword Researches Performed/website
- Total number of pages set as Focus Pages/website
- Total number of pages ranking in the top 100 of Google/website
- Average optimization/website
- Total number of keywords in Briefcase/website
- Total number of SEO Audits/website
- Total number of SERP Checks/website

For specific time intervals, choose from:
- All time
- Last 365 Days
- Last 30 Days
- Last 7 Days
After selecting, Squirrly will update the information displayed in the report.
Related Questions: More about the Web Dev Kit
✅ How to use the Web Dev Kit on a Website where Squirrly SEO is Already Installed?
✅ Can I only give the SEO plugin without cloud access to my clients?