Automation

Automation was built to optimize every single URL as soon as you activate the plugin on your website.
It’s all in the name. Automation is meant to automate and optimize on-page SEO and is very useful for times when you want to manage an entire site fast and don’t want to worry about each individual page.
Think of this section as a Master Control Board where you can quickly work on your site globally and set up the SEO for it in just a few minutes.
By default, Squirrly SEO adds all the commonly-known and used Post Types to Automation in order to automate the optimization for them (to do this, Squirrly also adds default Patterns to each of those Post types).
WooCommerce Automation
- To reach this option, go to: Squirrly SEO > Optimize > Automation > Automation – Configurations
It’s important to mention that Squirrly SEO integrates with WooCommerce. So, if you have the WooCommerce plugin installed on your website, then the Product, Product Category, and Product Tag post types will automatically be added to Automation as well.
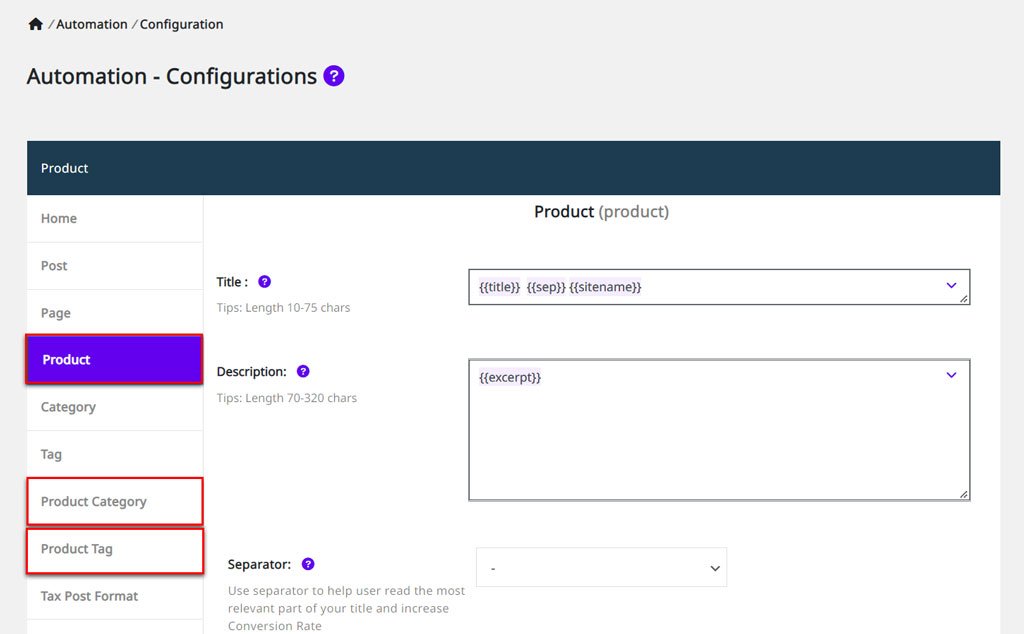
Using the Automation features from Squirrly SEO allows you to re-optimize a WooCommerce store featuring 2,000 products in just a couple of minutes. That’s amazing WooCommerce SEO value!
If you are an SEO beginner, it’s not necessary to make any major changes in the Automation section, as the default values which Squirrly attributes automatically for Automation are enough to:
- ensure your post types are displayed correctly on your site, within Search Engine Results, and social media feeds.
- prevent Title and Description duplicates between posts.
- ensure Google won’t index and send authority to Post Types that shouldn’t be indexed.
Given all the results documented by the many success stories and our experience in SEO, we recommend that you stick to the patterns that Squirrly automatically adds to each post type if you are not an SEO expert.
If you are an SEO expert or an advanced user, you can customize the on-page SEO using patterns and personalize the METAs, Open Graph, Twitter Card, JSON-LD, Google Analytics, Facebook Pixels, Search Engine Visibility, and more for every post type.
Access Automation

How to Add New Post Types so that You Can Customize the Automaton for it
If your website uses a custom post type that is NOT currently present in the Automation list, then Squirrly SEO will use the Custom post type by default. However, you can also add new post types for custom automation (as long as Squirrly SEO detects it on your website).
To add a new post type for custom automation, select the post type from the list and click on the Add Post Type button. Then you can begin the customization for that post type.

Once a Post Type is Added to the List, You Can Easily Customize the Automation for it
To access the available Patterns for each post type, you first have to select the post type you want from the Configuration section. Then you can easily:
- ADD a Pattern by selecting the pattern you want and then clicking on it to insert;
- REMOVE a pattern using the DELETE key or by double-clicking on it.
How to Use Patterns and the Role They Play in Automation
- To reach this option, go to: Squirrly SEO > Optimize > Automation > Automation – Configurations
Squirrly Patterns play an important role in Automation. Every pattern will be replaced by the real value that’s associated with it. So, for example, the Pattern {{title}} will be replaced by the post’s title.
The Pattern system is extremely useful when it comes to helping you prevent Title and Description duplicates between posts.
In Squirrly SEO, each post type in your site comes with a predefined posting pattern when displayed onto your website.
However, based on your site’s purpose and needs, you can also decide what information these patterns will include. Once you set up a pattern for a particular post type, only the content required by your custom sequence will be displayed.
! Important
Not all Patterns are applicable to every Post Type.
For example, for the Home Page post type, adding the {{product_name}} pattern won’t work (and would not make sense for it to work) since a Home page should not contain this type of data.
To check if a pattern you’ve selected applies to your post type, go to that post type and take a look at the information Squirrly displays for that post type. (after completing the automation, and clicking on Save Settings)
On the other hand, certain Patterns can be applied to EVERY post type.
A good example of that is the {{title}} pattern which adds the title of the post/page once it’s published. Another example of a pattern that can be applied to every post type is the {{excerpt}} pattern which will display an excerpt from the post/page.
Note! If not customized, the excerpt will be auto-generated, displaying the first lines of text from your post/page.
Now let’s take a look at the COMPLETE LIST OF PATTERNS available in Automaton – and what each one of them does:
- {{date}} – Displays the post/page’s publishing date.
- {{title}} – Adds the published title of the post/page.
- {{page}} – Displays the number of the current page (i.e. 1 of 6)
- {{parent_title}} – Adds the title of a page’s parent page. (according to how it’s set up in Page Attributes)
- {{sitename}} – Adds the site’s name. (as it’s set up in Settings > General > Site Title)
- {{sitedesc}} – Adds the site’s description. (as it’s set up in Settings > General > Tagline)
- {{excerpt}} – Will display an excerpt from the post/page – as it appears in the excerpt field in WordPress for that particular page/post. If not customized, the excerpt will be auto-generated, displaying the first lines of text from your post/page.
- {{excerpt_only}} -Will display an excerpt from the post/page – as it appears in the excerpt field in WordPress for that particular page/post. As opposed to the {{excerpt}} Pattern, there’ NO auto-generation for {{excerpt_only}}; if the excerpt field is NOT customized, {{excerpt_only}} will NOT display anything.
! Additional info: If the excerpt field is not enabled/visible on your Page and Post dashboard, you need to enable it via Screen Options. Keep in mind that some themes may lack to create this field on Page.
- {{tag}} – Includes the tag(s) that is/are assigned to the post in the post description.
- {{category}} – Displays the name of the category that’s assigned to that post/page. If the post/page is assigned to multiple categories, the names of the categories will be comma-separated.
- {{primary_category}} – Adds the name of the primary category that is assigned to a post/page.
- {{category_description}} – Includes the description of the category that is assigned to a post in the post description (as it’s defined in Edit Category > Description field)
- {{tag_description}} – Adds the tag’s description (as it’s defined in Edit Tag > Description field)
- {{term_description}} – Adds the term description.
- {{term_title}} – Adds the title/name of the term that’s assigned to the post.
! Additional info: In WordPress, terms refer to the items in a taxonomy. (read more about it here)
- {{searchphrase}} – Displays the search phrase. (if it appears in the post)
- {{sep}} – Places a separator between the elements of the post description.
- {{modified}} – Every post has the date it was modified registered in the database. This pattern replaces the publication date of a post/page with the modified one and displays it.
- {{name}} – Displays the name of the Author assigned to that post. (as it appears in Profil > Display Name Publicly as: section in WordPress)
- {{user_description}} – Adds the biographical info of the Author assigned to that post to the post description (as it appears in Profile > Biographical info section in WordPress)
- {{currentdate}} – Displays the current date.
- {{keyword}} – Adds the post’s keyword to the post description. (this information is retrieved from the Squirrly SEO Snippet)
- {{currentday}} – Adds the current day.
- {{currentmonth}} – Adds the current month.
- {{currentyear}} – Adds the current year.
- {{product_name}} – Adds the product name for the selected WooCommerce products
- {{product_price}} – Adds the product price for the selected WooCommerce product.
- {{product_price_with_tax}} – Adds the product price with Tax for the selected WooCommerce product.
- {{product_currency}} – Adds the product currency for the selected WooCommerce product.
- {{product_brand}} – Adds the product brand for the selected WooCommerce product.
All these patterns can also be used in Squirrly SEO’s Snippet METAs to automate the SEO for all posts, pages, categories, tags, products, custom post types, and custom taxonomies.
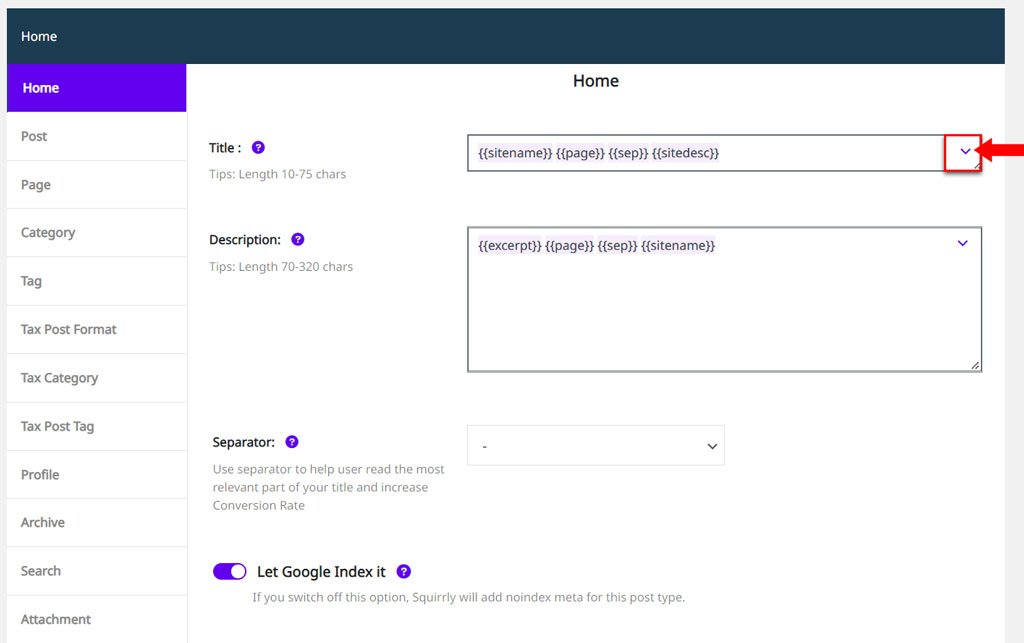
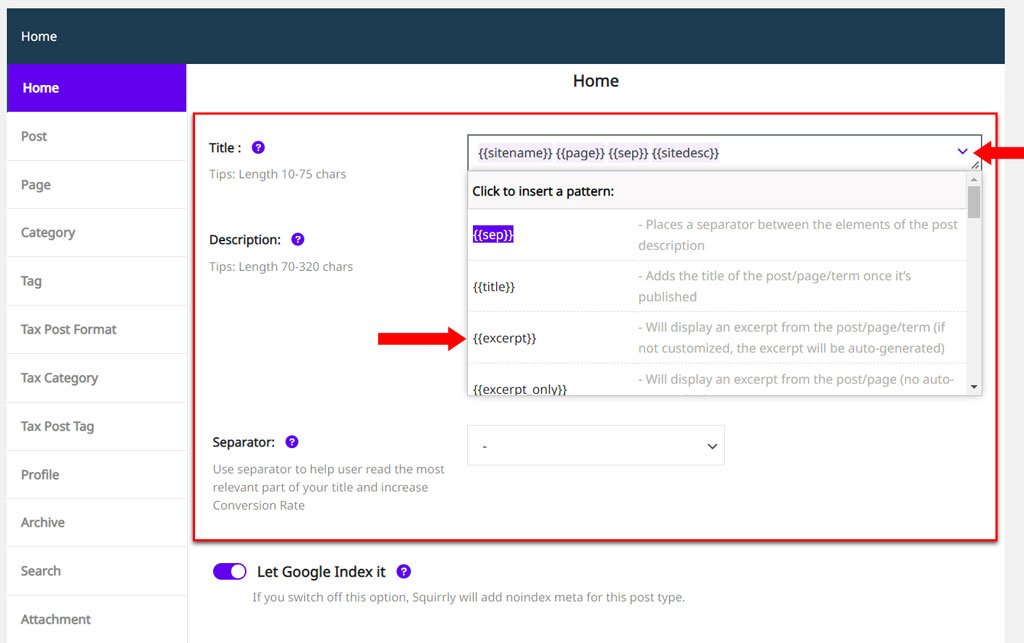
To use patterns for Automation, click on the arrow next to the input field and select the available patterns for that specific post type.
To help you better understand everything you can do in the Automation section of Squirrly SEO, we’re going to break down setting up the automation for some of the most common post types, starting with the Home page.
NOTE! To configure the automation for each post type, go to Squirrly SEO > Optimize > Automation > Automation – Configurations.
1. Setting Up the Automation for the Home Page Post Type
- To reach this option, go to: Squirrly SEO > Optimize > Automation > Automation – Configurations
Whether your Home Page consists of a list of the latest posts published on your site or it’s a static page (doesn’t contain blog posts or other regularly updated content), Squirrly SEO will detect it and use the Automation set for it.
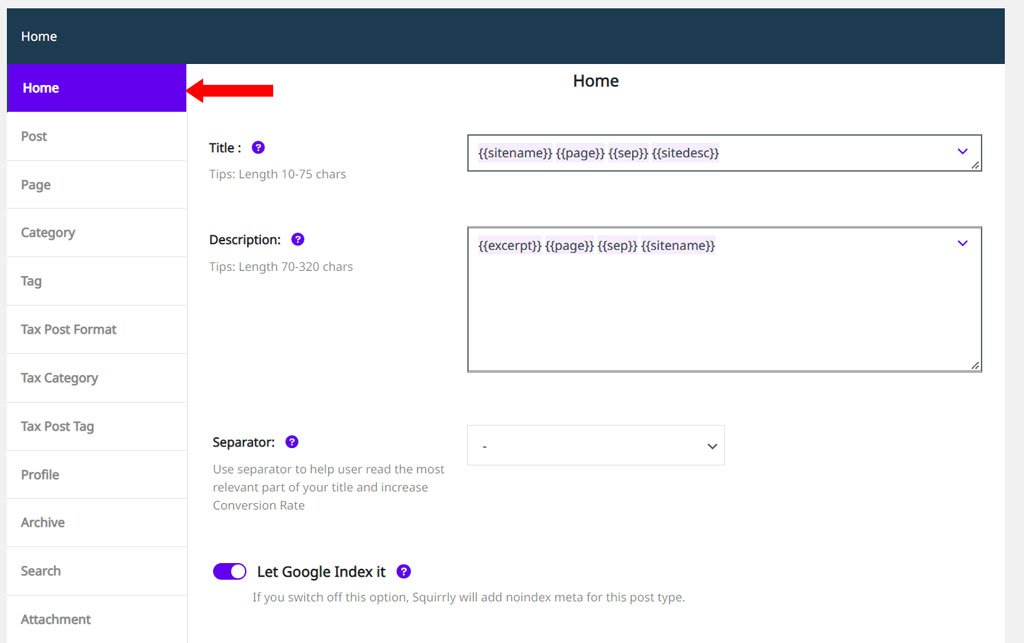
First, select Home from the Post Type list.
Then, you can set the Title and Description METAs using patterns and also select the Separator sign.
Automation for Title
- To reach this option, go to: Squirrly SEO > Optimize > Automation > Automation – Configurations
Using Patterns, you can customize how your titles will be displayed – at the level of every single Post Type created by your WordPress.
Automation for Description
- To reach this option, go to: Squirrly SEO > Optimize > Automation > Automation – Configurations
Using Patterns, you can customize what will be included in your descriptions – at the level of every single Post Type created by your WordPress.

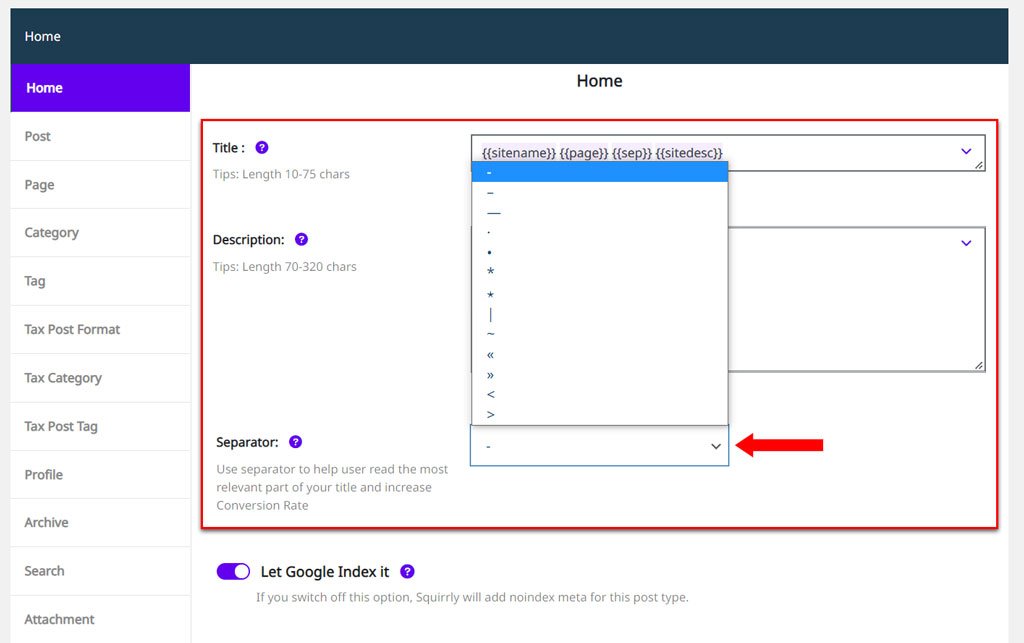
Separator {{sep}} Pattern
- To reach this option, go to: Squirrly SEO > Optimize > Automation > Automation – Configurations
The {{sep}} pattern can be used multiple times in automation and will be replaced with the Separator value. Very useful for times when you want to separate your post title from your site name, for example.
You can select how the separator will look like from the Separator section shown in the screenshot below (you can easily find it just below the Description section)
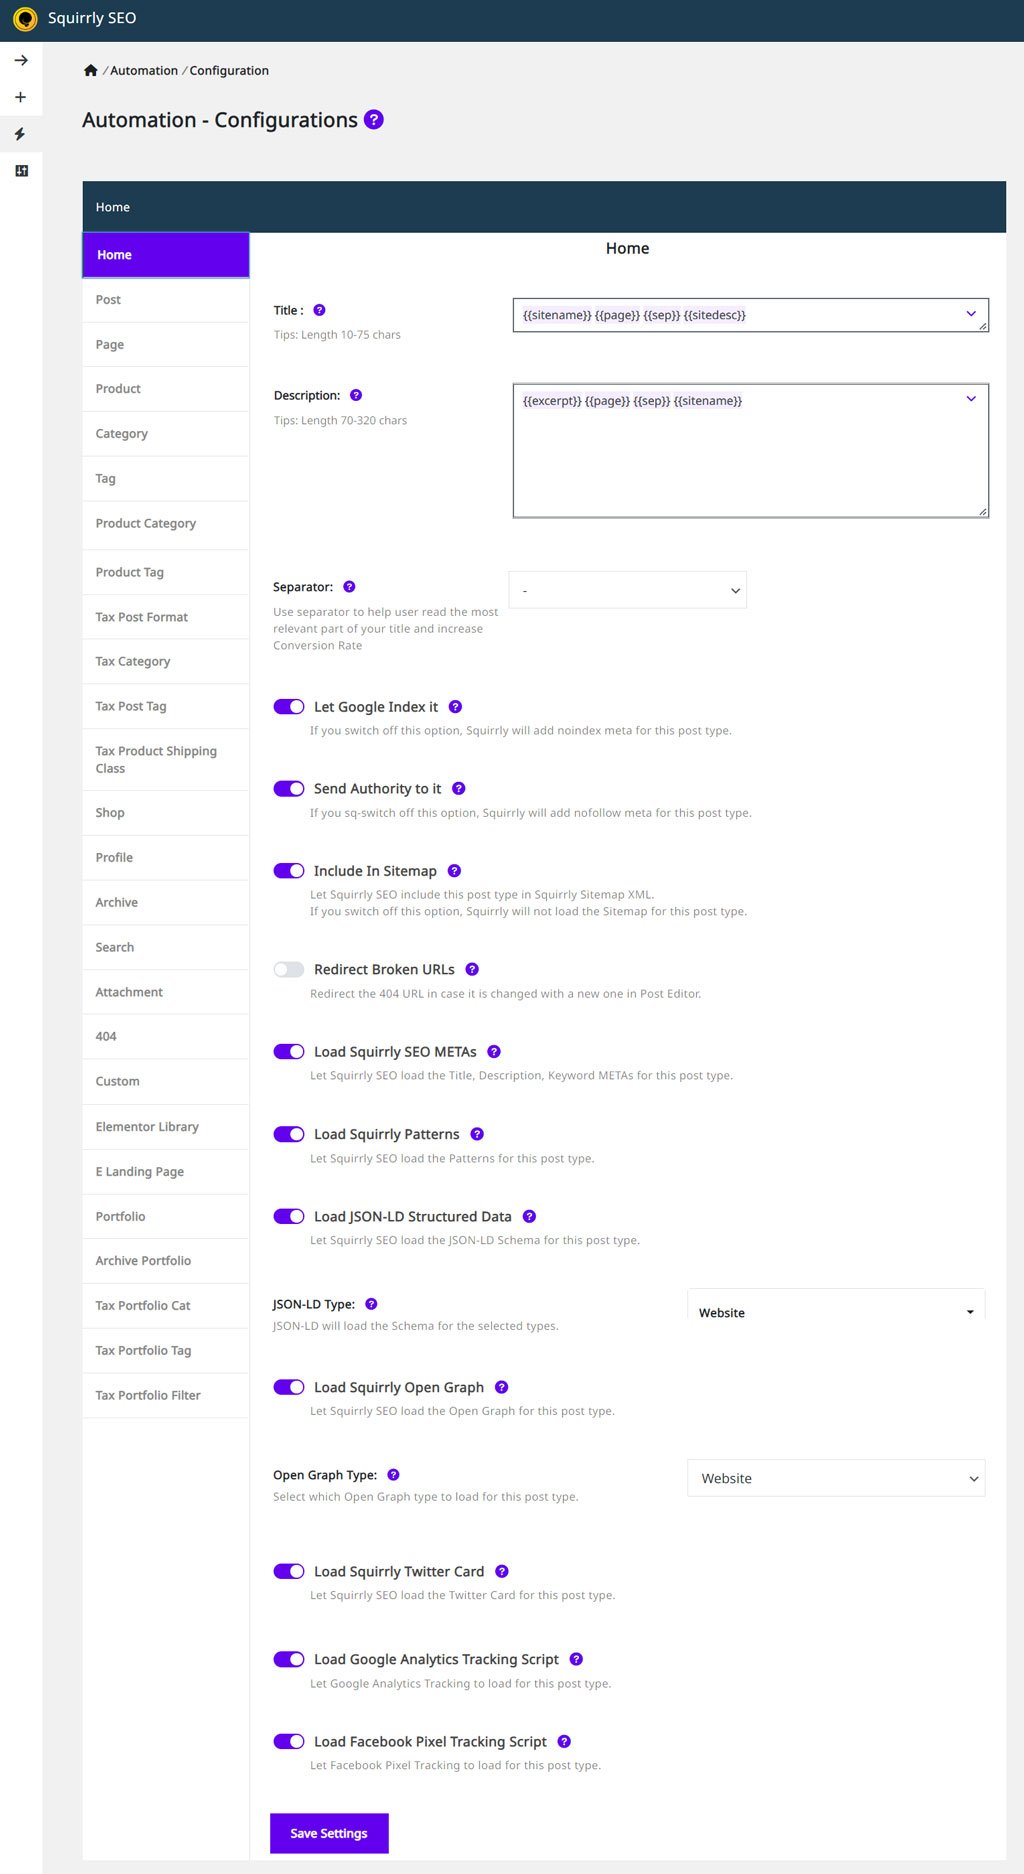
Let Google Index It
- To reach this option, go to: Squirrly SEO > Optimize > Automation > Automation – Configurations
By default, Squirrly sets this option to ON.
If you switch it to OFF, then Squirrly will add a no-index META for this post type. So, if you switch this OFF, you’re basically telling search engines to NEVER show pages within a specific post type in their results.
Switch ON the option: Let Google Index It to remove any noindex robot META from the source-code and allow Google to show your Home Page in their results.
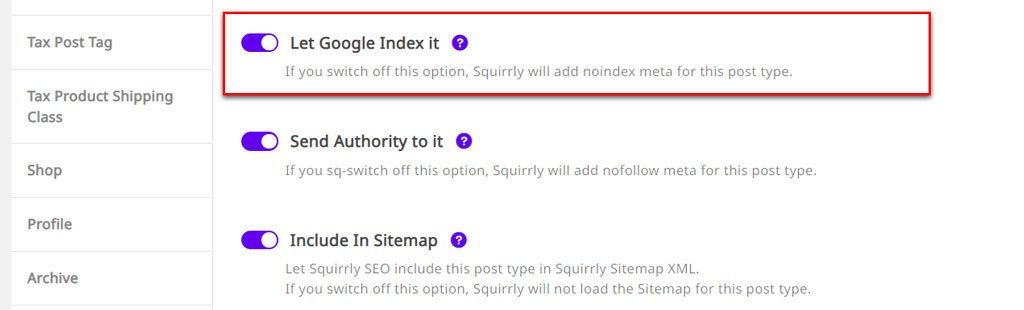
Send Authority to it
- To reach this option, go to: Squirrly SEO > Optimize > Automation > Automation – Configurations
With this option, you’re telling Google whether or not to allow other websites to send authority to pages that belong to a certain post type.
By default, this option is set to ON for the Home page post type.
If you switch OFF this option, Squirrly will add nofollow meta for this post type. (by doing this, you’re telling Google NOT to count the links your page receives from other websites as votes in favor of your content)
The Send Authority to it toggle should be switched to ON to let Google send authority from other websites to your Home page.

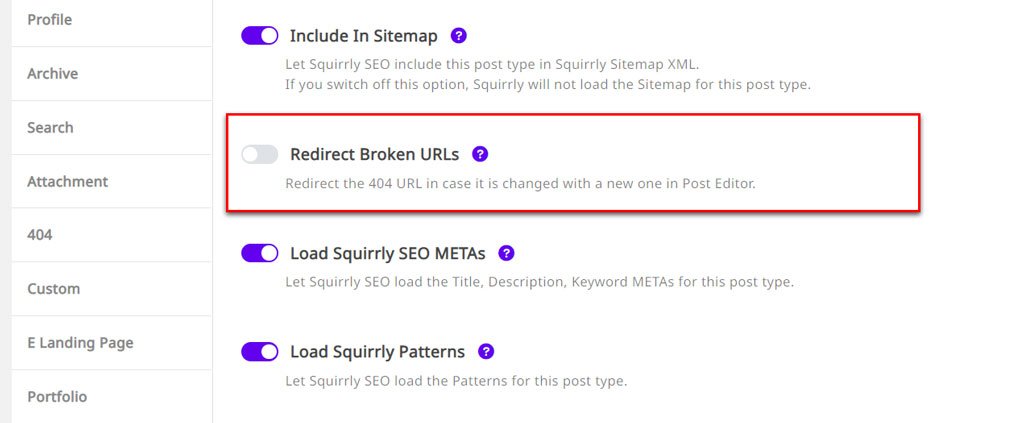
Include In Sitemap
- To reach this option, go to: Squirrly SEO > Optimize > Automation > Automation – Configurations
With this option, you can choose whether to let Squirrly SEO include a post type in the Squirrly Sitemap XML or not.
If you switch this option OFF, Squirrly will NOT load the Sitemap for this post type.
The settings you make here will also reflect in the Sitemap XML section of Squirrly.
Namely, if you turn the Include in Sitemap option to OFF for the Home page post type, and then go to Sitemap XML, you’ll see that Squirrly will NOT build sitemaps for the Home page post type. (alongside a message letting you know you’ve deactivated this from the Automation section)
Switch the Include in Sitemap toggle to ON so that Squirrly will add the Home Page in the sitemap.xml.

Include In Google News Sitemap
- To reach this option, go to: Squirrly SEO > Optimize > Automation > Automation – Configurations
With this option, you are able to use Squirrly SEO in order to include different post types such as Web Stories in the Google News Sitemap (essential for appearing in Google News).
Make sure the toggle for Include In Google News Sitemap is switched to ON for post types that you want Squirrly SEO to include in the Google News Sitemap.
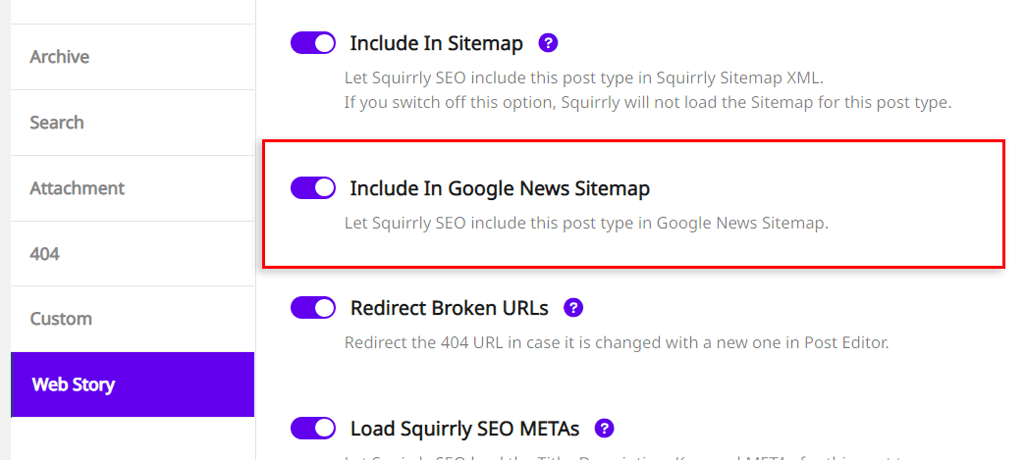
Redirect Broken URLs
- To reach this option, go to: Squirrly SEO > Optimize > Automation > Automation – Configurations
How does this option help you?
Say you’ve just created a new article. In this case, by default, the slug (the part of a URL which identifies a particular page on a website) will be generated based on the title of that article. However, it could be that you created that title before knowing which keyword you want to optimize your article for, and didn’t include it in the title.
If you try to add the keyword in your article after the slug was created, it still won’t show in the slug. You can modify the slug after the article was published, but in this case, the first slug you created will link to a 404 Page.
It could also be that your article has already been indexed by Google and has authority. In this case, it can be very detrimental to your site to modify the slug and have the original link send people to a 404 Page.
And this is where the Redirect Broken URLs option comes in handy.
By switching this to ON, Squirrly will apply a 301 redirect – recommended for SEO because it’s a permanent redirect that passes full link equity (ranking power) to the redirected pages.
This helps ensure that in case a certain URL has been modified, the original URL will automatically send people directly to the modified one (while also passing authority) – without having to install a redirect plugin on your site.
Furthermore, this will NOT impact the Authority of your page or negatively affect the page’s position in Google.
By default, this option is set to OFF for all Post Types.
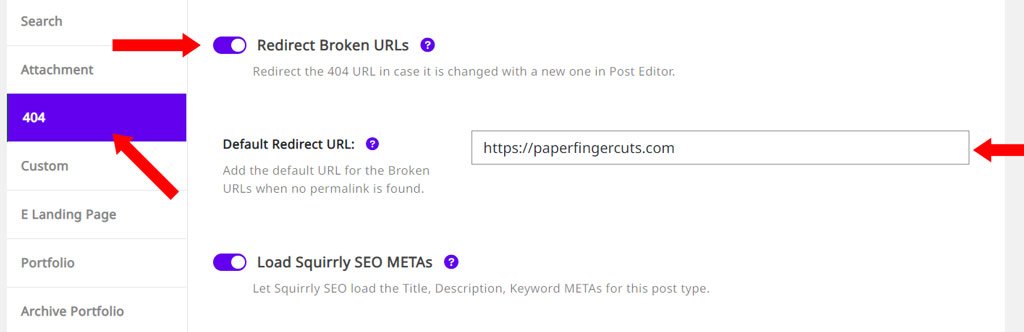
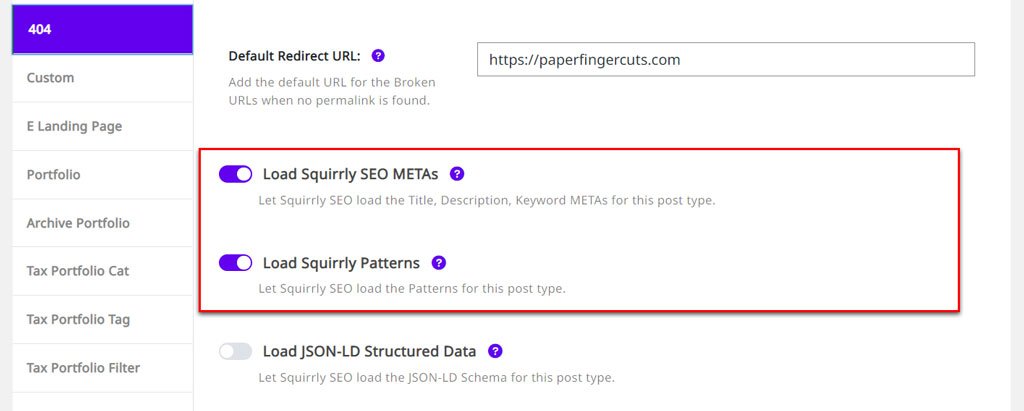
Default Redirect URL in Automation > 404
- To reach this option, go to: Squirrly SEO > Optimize > Automation > Automation – Configurations
For 404 Post Types, Squirrly offers the option to configure a Default Redirect URL to redirect the broken URLs when no valid permalink is found.
Go to Squirrly SEO > Optimize > Automation > Automation – Configurations > 404 and scroll down to Default Redirect URL to set this up.
Note that in order be able to set up a default redirect URL, the option Redirect Broken URLs needs to be enabled for the 404 Post Type. (as shown in the screenshot below)
Important! If you don’t see the Default Redirect URL option in Optimize > Automation > Automation – Configurations > 404, you can reinstall the current version of Squirrly SEO by going to Squirrly SEO > Technical SEO > Import & Data > Rollback Plugin and clicking on Reinstall Current Version.
This way, you can make sure all updates we’ve made to the current version of Squirrly SEO are visible for your site.

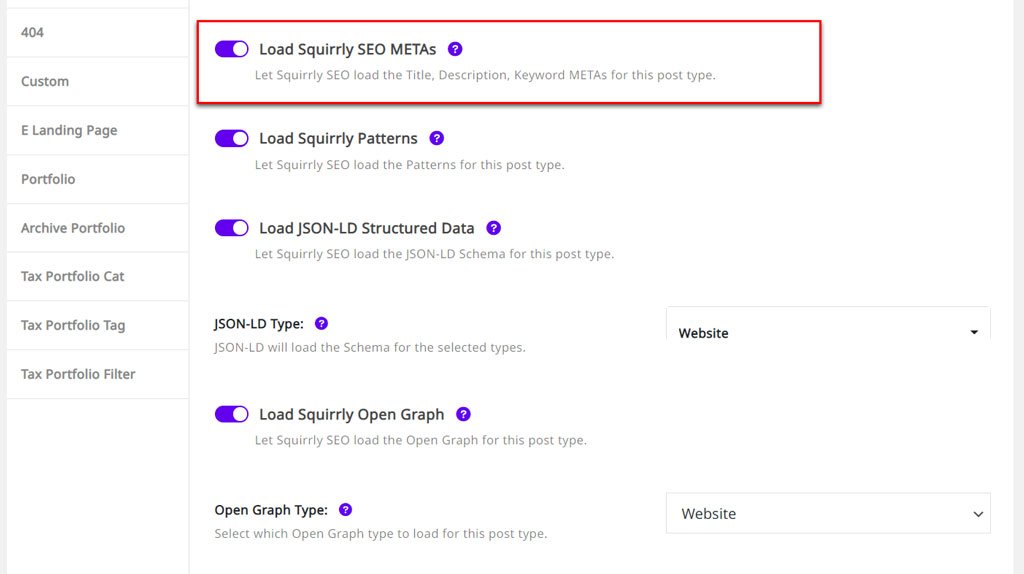
Load Squirrly SEO METAs
- To reach this option, go to: Squirrly SEO > Optimize > Automation > Automation – Configurations
By activating this option, you’re letting Squirrly SEO load the Title, Description, Keyword METAs for a post type. Switching this to OFF automatically deactivates the Automation for Title and Description. Therefore, we recommend having this option ON.
In case you want to use another SEO plugin for a certain post type, you can switch this to OFF for that post type. If you use another SEO plugin for all post types, you can turn it OFF for all post types.
Activating the METAs allows you to edit the Title, Description and Keywords for all pages included in that post type (in this case, the Home page post type).
All SEO metas for each individual page within a post type can be further customized from the BULK SEO section in Squirrly SEO.
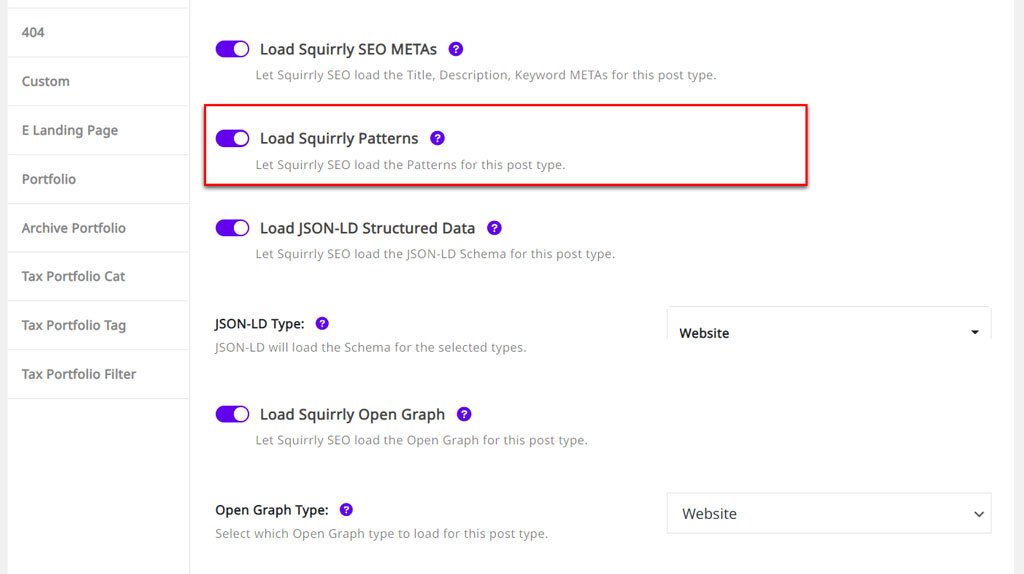
Load Squirrly Patterns
- To reach this option, go to: Squirrly SEO > Optimize > Automation > Automation – Configurations
Patterns are required for Automation. If you have patterns, but have the Let Squirrly SEO load the Patterns for this post type switched to OFF, Squirrly will display the pattern, NOT the value associated with it.
If you don’t have patterns in your titles and descriptions, and switch the Load Squirrly Patterns for this post type to OFF, then you’re basically letting WordPress decide what information to place in your titles and descriptions (for that post type).
If you have a post type, for example, and decide that you want to create your own custom titles and descriptions and therefore DON’T want to set up an automation for it, then you can set this option to OFF and manually customize the SEO Snippets for that post type using Bulk SEO.
Or you can have this option set to ON, and then use the BULK SEO section of Squirrly to customize how your pages appear in search results and social media feeds.
Load JSON-LD Structured Data
- To reach this option, go to: Squirrly SEO > Optimize > Automation > Automation – Configurations
Adding structured data to your pages can enhance your appearance in Google Search results.
More specifically, in addition to your titles and descriptions, Google will display extra information related to your page. Google Search also uses structured data to enable special search result features.
JSON-LD Structured Data has become increasingly more important, as Google has worked to add many options for JSON-LD, meaning that your pages can be eligible for many different types of enhancements.
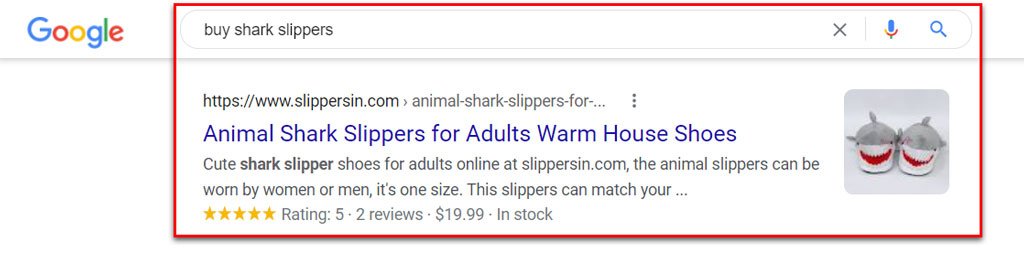
For example, a product page with valid structured data can be displayed with product information (price, availability, and review ratings).
By default, the option Load JSON-LD Structured Data is set to ON for each post type.
When this is set to ON, it activates Schema.org so that Squirrly can create the JSON-LD Structured Data for that post post type.
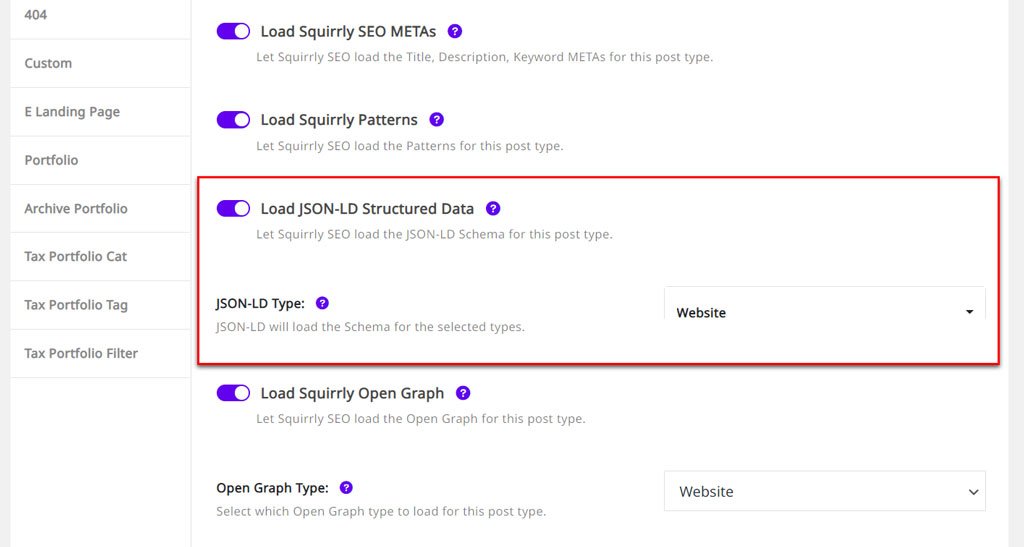
By default, the JSON-LD type is set to:
- Website (for post types such as Home page, Category, 404, Archive, Tag)
- Newsarticle (for the Post and Page post types)
- Profile (for the Profile post type)
- Product (for the Product post type)
For the Home page, there’s NO need to add any type of custom information for JSON-LD, as Squirrly will retrieve the data necessary for it from its database.
However, for other post types, like Post or Page, you have an extensive list of JSON LD types to choose from, including:
- local store,
- local restaurant,
- article,
- news article,
- FAQ page,
- recipe,
- question,
- review.
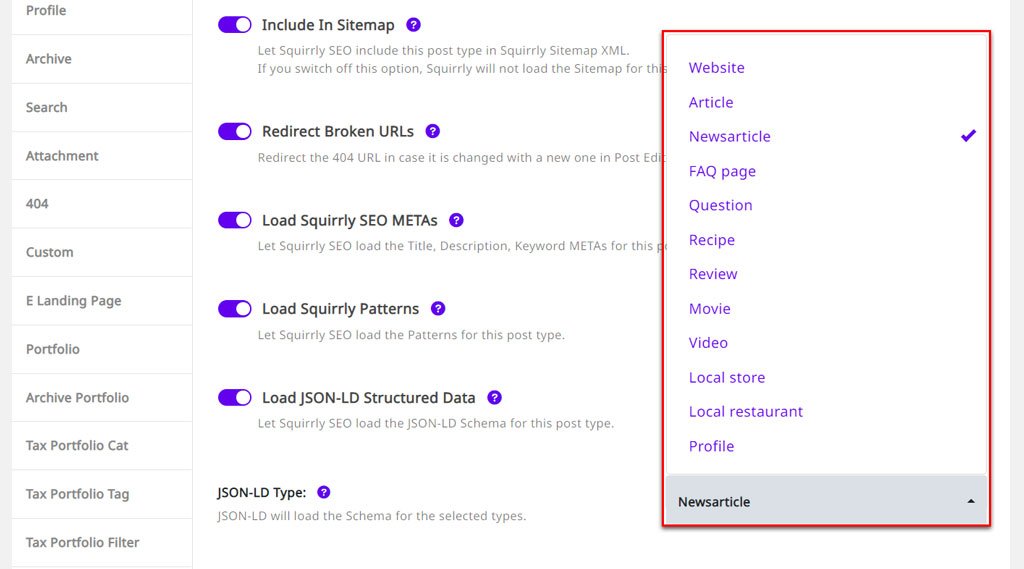
Select Multiple JSON-LD Types
- To reach this option, go to: Squirrly SEO > Optimize > Automation > Automation – Configurations
You can select multiple JSON-LD types for a single post type. For example, you can select both Question and FAQ page, as the two go hand in hand.
! IMPORTANT
You can further customize the JSON-LD for each individual page within a Post Type from the BULK SEO section in Squirrly SEO.
A quick note!
Squirrly SEO is compatible with the Advanced Custom Fields plugin.
This plugin allows you to create custom fields for different pages in WordPress, including recipes pages.
So, for example, if you select recipe as a JSON-LD type and used the Advanced Custom Field plugin to create custom fields for your recipe pages, Squirrly will retrieve that information and use it to build the recipe JSON LD type.
Read more about the Advanced Custom Fields integration here.
Load Squirrly Open Graph
- To reach this option, go to: Squirrly SEO > Optimize > Automation > Automation – Configurations
By default, the option Load Squirrly Open Graph is set to ON.
With this option, you are allowing Squirrly SEO to load the Open Graph metas and activate social media optimization for a particular post type (in our example, the Home page post type). This way, you’ll have everything set up to ensure your posts display beautifully when shared on Facebook.
You can also select the Open Graph type for each post type from this section. By default, the Open Graph type is set to:
- Website (for the Home page post type – and any other post type with the exception of: Profile, Post, Page, and Product post types)
- Profile (for the Profile post type)
- Article (for the Post and Page post types)
- Product (for the Product post type)

! IMPORTANT
All Open Graph metas for each individual page within a post type can be further customized from the BULK SEO section in Squirrly SEO.
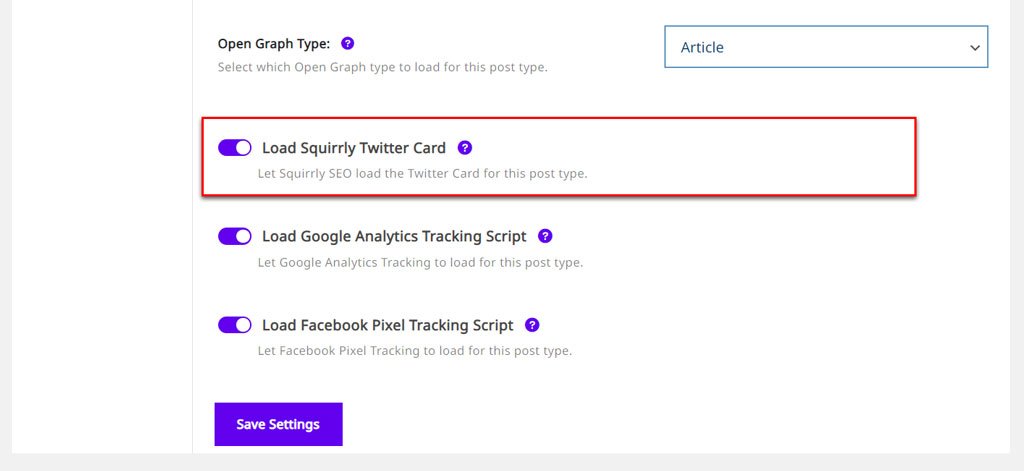
Load Squirrly Twitter Card
- To reach this option, go to: Squirrly SEO > Optimize > Automation > Automation – Configurations
By default, the option Load Squirrly Twitter Card is set to ON.
With this option, you are allowing Squirrly SEO to load the Twitter Card metas and activate social media optimization for a specific post type. This way, you’ll have everything set up to ensure your posts display beautifully when shared on Twitter.
! IMPORTANT
Twitter Cards for every individual page within a post type can be further customized from the BULK SEO section in Squirrly SEO.
Load Google Analytics Tracking Script
- To reach this option, go to: Squirrly SEO > Optimize > Automation > Automation – Configurations
For post types where the Load Google Analytics Tracking Script is set to ON, Tracking Tools for Google Analytics are activated.
So, with this option turned ON, you’re allowing Google Analytics Tracking to load for a specific post type.
! For this option to work when enabled, the Google Analytics tracking code must be added to your site.
Load Facebook Pixel Tracking Script
- To reach this option, go to: Squirrly SEO > Optimize > Automation > Automation – Configurations
For post types where the Load Facebook Pixel Tracking Script option is set to ON, Tracking Tools for Facebook Pixel are activated.
So, with this option turned ON, you’re allowing Facebook Pixel Tracking to load for a specific post type.
! For this option to work when enabled, the Facebook Pixel tracking code must be added to your site.
Once you set the automation for a specific post type (in this example, the Home page) you can save your settings by clicking on Save Settings and move on to the next post type.
2. Setting Up the Automation for a Search Page
- To reach this option, go to: Squirrly SEO > Optimize > Automation > Automation – Configurations
This allows you to customize the automation for Search – pre-filled with amazing patterns and ideas to have Google index your searches just like top e-commerce sites worldwide.
Setting up the automation for the Search Page is pretty much the same as for the Home Page.
One of the advantages of using Automation and Patterns in Squirrly SEO is that you can combine static text with patterns (as you can see in the example below). In this example, the {{searchphrase}} pattern was used.
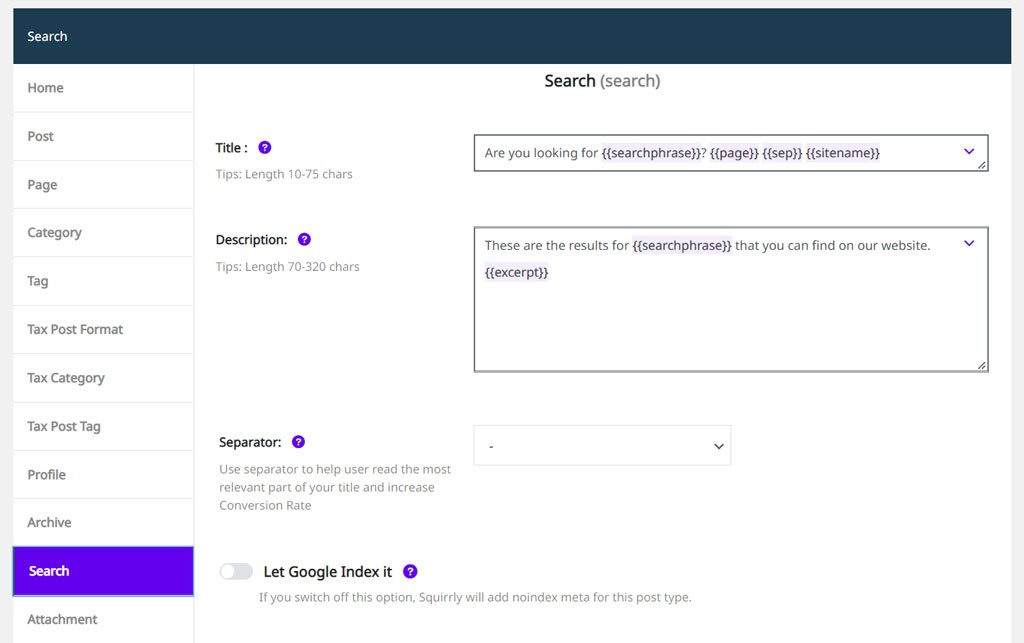
^^ The {{searchphrase}} pattern displays the search phrase (if it appears in the post) when the post is shown in Google.
Here’s how the post from the example above will look like in SERPs when shown for the search query: cat food.

People searching on Google will see that your post contains the exact search query they used, which can help you attract more buyers when they search on Google for a product or service related to your business.
3. Setting Up the Automation for a 404 Page
- To reach this option, go to: Squirrly SEO > Optimize > Automation > Automation – Configurations
By default, Squirrly turns the Let Google Index it option to OFF, in order to keep your 404 Pages out of Search Results.
It’s best to leave this as-is, since having your 404 pages indexed in Google or added in the Squirrly Sitemap XML won’t bring you any benefits.
You also don’t have to activate the tracking tools for this post type.
To optimize the Automation for a 404 page, having the following switched OFF is enough:
- Google index,
- Authority,
- Sitemap,
- Trackings,
- and Social Media.
All you need to have turned ON for a 404 page are the:
- Load Squirrly SEO METAs;
- Load Squirrly Patterns.
Custom META Lengths
Within the Automation section of Squirrly SEO, you can also customize the lengths for each meta.
There have been several occasions in which platforms like Google and Twitter have increased their Description length limit and even the META Title length limit.
Squirrly SEO offers you full customization of the META lengths so that you don’t have to wait for plugin updates when these sort of things happen, and if Twitter, for example, decides to increase the number of characters it will display for a post’s description when shared on their platform.
All you have to do is go to: Squirrly SEO > Optimize > Settings > META Lengths and add the new values in the dedicated sections.
(IMPORTANT NOTE!) The section where you can add custom META lengths is only visible when using Squirrly SEO with SEO Expert Mode.
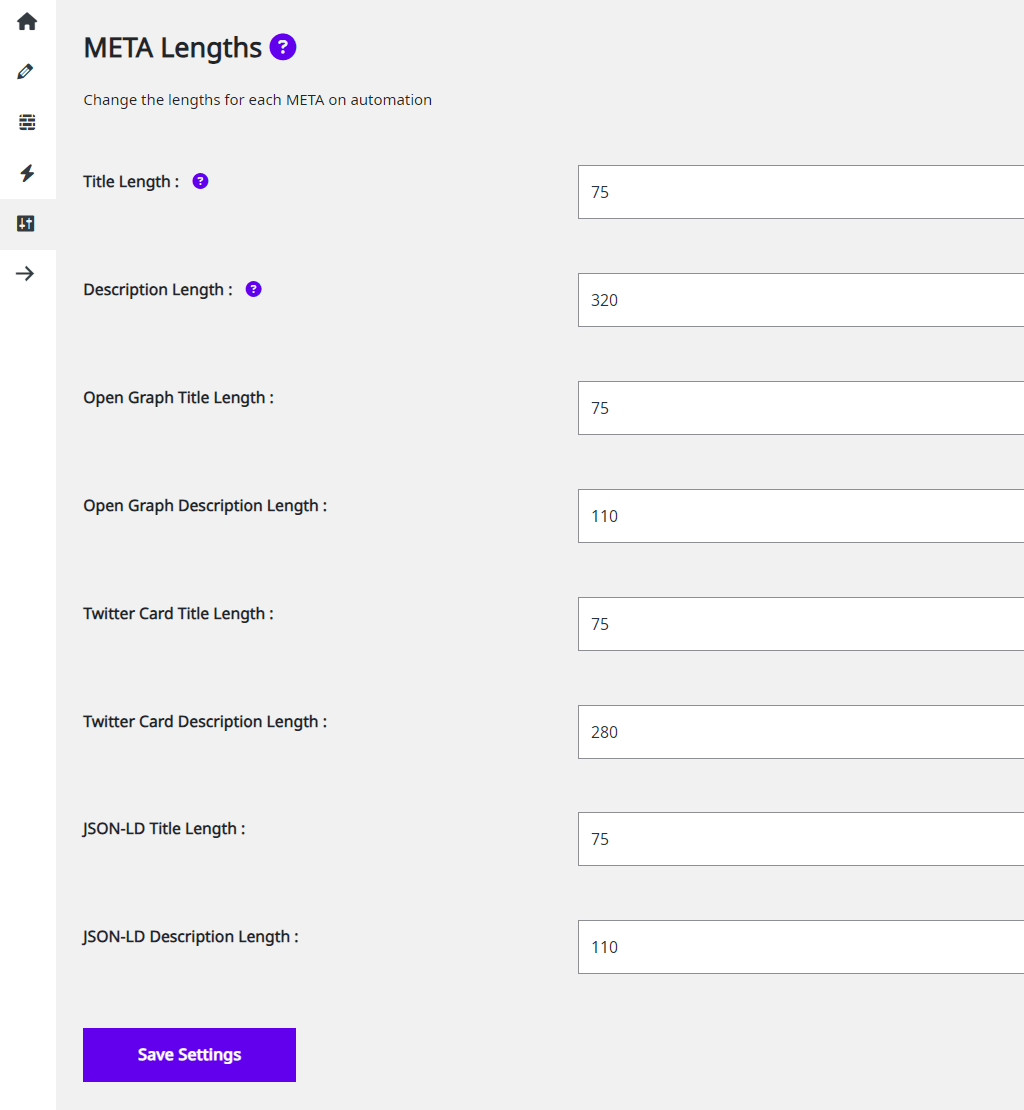
Once you do this and save your settings, the Squirrly Snippet and Assistant will automatically update the limits, and you will get insights based on the new lengths.
Best Practices
- If you decide to keep a post type out of Google Search Results by switching the Let Google Index It option to OFF, then make sure that the Include in Sitemap option is also set to OFF.
- For post types such as 404, it’s best to leave the Send Authority to it option switched to OFF. This way, Squirrly will add nofollow meta for this post type (which tells Google NOT to allow Authority to be sent to pages that belong to this post type).
- Other post types for which it’s best to have the Send Authority to it option switched to OFF are: the Category post type and the Tag post type. Unlike blog post articles, for example, these post types don’t have a lot of value from a content standpoint, so it’s best NOT to have authority sent to them.
- Make sure the Include in Sitemap option is always switched to ON for Post, Page, and Product post types.
- You can have the Include in Sitemap option switched to OFF for the following post types: Category, Tags, 404, Attachment. (unless you have a site for images)
- For the Post and Pages post types, we recommend having the Redirect Broken URLs switched to ON.
- As mentioned in the INTRO, only customize the automation for each post type if you are confident in your SEO knowledge and are 100% sure that you know what everything in this section refers to. If you are not an SEO expert or an expert user, it’s best to stick with the default values Squirrly has assigned to every category, for every post type.