Import and Data

You can use the Import and Data feature to:
- Import the Settings and SEO from other plugins you’re using in case you want to use Squirrly SEO exclusively for on-page SEO, for example;
- Back up settings and SEO before importing the settings and SEO from other plugins (so that you DON’T lose them)
- Back up Squirrly SEO’s settings so that you can use them again;
- Back up the Settings made with Squirrly SEO in case you’re experimenting with different SEO settings, and want a safety net that you can always come back to.
There are 4 main sections in the Import/Export settings page:
Each one of them serves a well-defined purpose, and we will explain what each section helps you achieve in more detail.
But first, let’s take a look at how you can access this section.
How to Get Access to the Import & Data Section of Squirrly SEO
The Import& Data panel is located in the SEO Configuration section of Squirrly SEO. Navigate to Squirrly SEO > Technical SEO > Import & Data to reach it.

Import Settings & SEO from Other SEO Plugins
- To reach this section, go to: Squirrly SEO > Technical SEO> Import & Data > Import Settings & SEO
Using a lot of plugins may affect website speed, which is one of the reasons why we don’t advise using multiple SEO plugins at once.
There is no need to use another plugin for SEO, as Squirrly’s over 650 features cover all SEO METAs and every single aspect involved in ranking a site on Google. HOWEVER, you can use Squirrly SEO alongside other plugins if you want to, and the Import setting makes it very easy to import settings and SEO from other plugins.

!IMPORTANT
Looking at how Import SEO & Settings is set up, you may ask yourself why there are two different sections for this. The reason is that there is a clear distinction between Settings and SEO:
- Settings are things you set up, such as: using Meta, using Open Graph, and so on.
- SEO is what you work on and how you define custom texts.
🚨 Note – Squirrly maps imported METAs to WordPress content by Post ID. Therefore, Post IDs must match in order for the METAs to be successfully imported.
In WordPress every post, page, or custom post type has a unique numeric identifier called Post ID. When Squirrly’s Import SEO process brings in METAs from another plugin, it does so by matching those meta-records to the exact same Post ID in your current database.
If the destination site does not have a post/page with the same ID, Squirrly can’t find a match and the metadata for that item will not be imported.
Make sure you are importing into a site where the posts/pages keep the exact same Post IDs as in the source plugin.
To import settings from a plugin or theme, simply select the plugin or theme you want to import the Settings from – and click on Import Settings. You can import settings from:
- Add Meta Tags Plugin
- Gregs High Performance SEO
- Headspace 2
- Platinum SEO Pack
- SEO Pressor
- SEO Press
- SEO Title Tag
- SEO Ultimate Plugin
- Rank Math
- Yoast SEO (both FREE and Premium)
- All In ONE SEO Pack
- SEO Framework
!IMPORTANT
If you import the SEO settings from other plugins or themes, you will lose all the settings that you had in Squirrly SEO (the settings you import will overwrite the settings you make in Squirrly SEO). Make sure you backup your settings from Backup Settings & SEO before you do this.
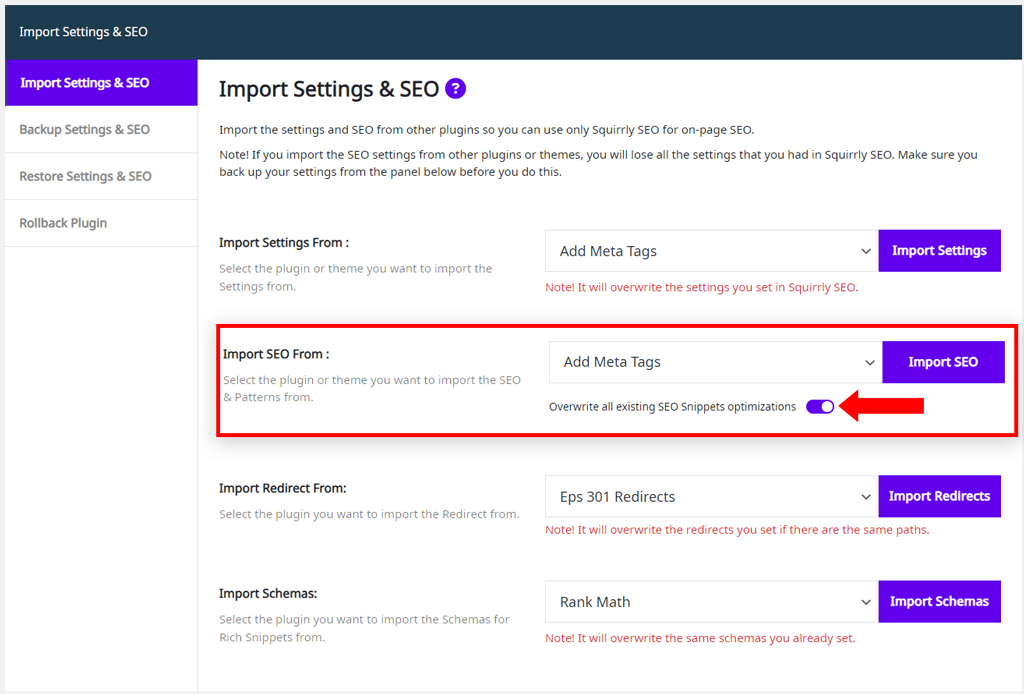
To import SEO from a plugin or theme, simply select the plugin or theme you want to import the SEO from – and click on Import SEO. You can import SEO from:
- Add Meta Tags Plugin
- Gregs High Performance SEO
- Headspace 2
- Platinum SEO Pack
- SEO Pressor
- SEO Press
- SEO Title Tag
- SEO Ultimate Plugin
- Rank Math
- Yoast SEO (both FREE and Premium)
- All In ONE SEO Pack
- SEO Framework
! IMPORTANT
By default, it will import only the SEO for the pages that were NOT yet optimized with Squirrly SEO. This will ensure that you don’t lose the SEO for pages that you already optimized with Squirrly.
So, unlike what happens for Import settings, the SEO you import will NOT overwrite the SEO for pages optimized with Squirrly – UNLESS you activate the option: Overwrite all existing SEO Snippets optimizations (shown below).
Import Redirect From:
We recommend importing redirects from other plugins immediately after activating the Redirects feature in Squirrly SEO and before setting up any new redirects.
That’s because the imported redirects will overwrite existing redirects if there are the same paths.
Using the “Import Redirects” button, you can import redirects you’ve set up using ANY of the following plugins:
- Eps 301 Redirects
- All in One SEO
- Redirection
- Rank Math
- Quick Redirects
- Squirrly SEO
- SEO Framework
- SEO Press
- Yoast SEO
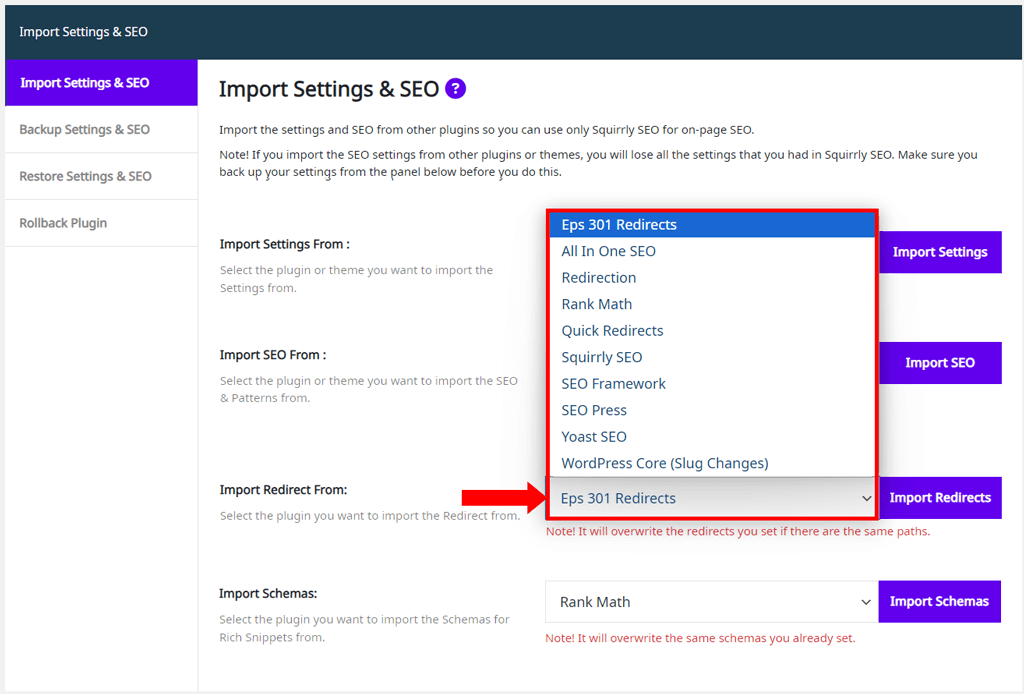
Additionally, you can import redirects from WordPress Core (Slug Changes)
🚨 Note! The imported redirects will overwrite the existing redirects if there are the same paths. Ensure you’re aware of this to avoid unwanted changes.
Import Schemas:
To use this option, select the plugin you want to import the Schemas for Rich Snippets from and click on Import Schemas. Squirrly currently supports importing schemas from Rank Math. When importing schemas, Squirrly SEO does not fetch Schema Templates that you’ve configured with Rank Math.
NOTE! If you import schemas for rich snippets from Rank Math, they will overwrite any of the same schemas you have previously set.

Backup Settings & SEO
- To reach this section, go to: Squirrly SEO > Technical SEO > Import & Data > Import Settings & SEO
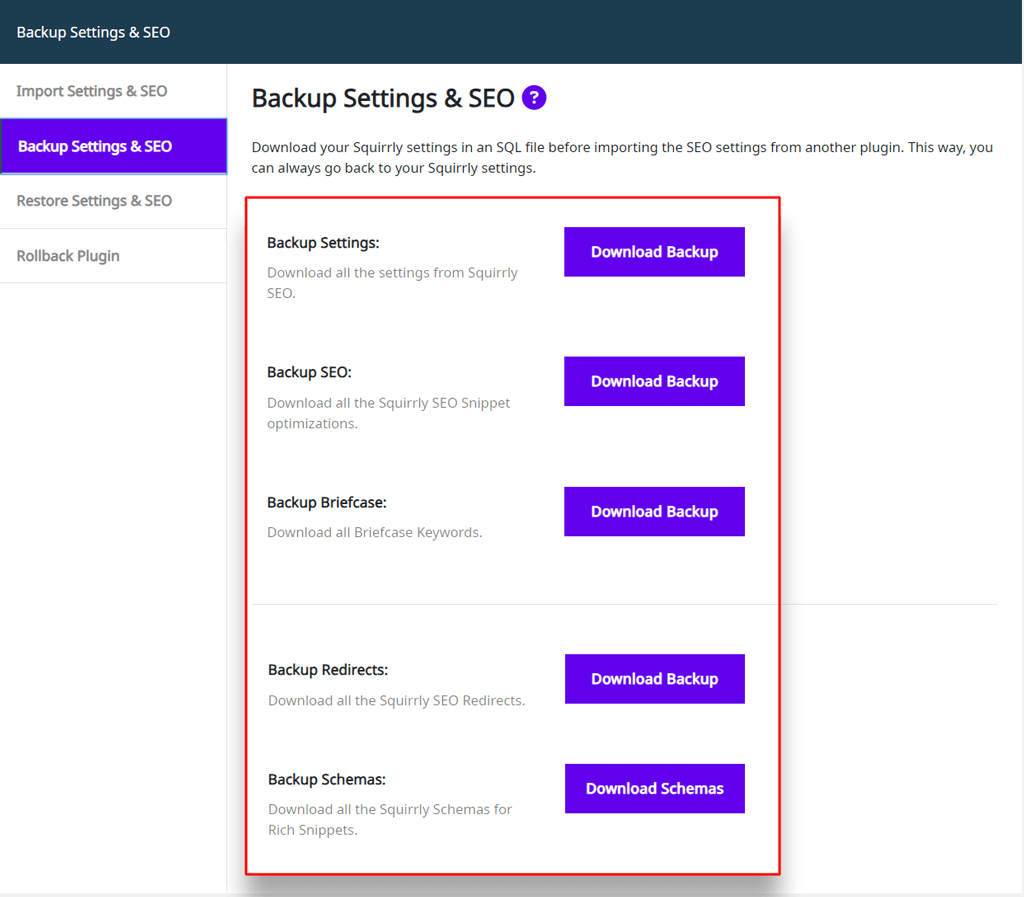
In this section, you can download your Squirrly settings, snippet optimizations, briefcase keywords, redirects you’ve set up using Squirrly SEO, and all the Squirrly schemas for rich snippets.
You can download all of these in an SQL file before you go ahead and import the SEO settings from another plugin.
That way, you can always go back to your Squirrly settings and restore your snippet optimizations, Briefcase keywords, as well as all the redirects and schemas for rich snippets you’ve set up using Squirrly SEO.
- Backup Settings: Download all the settings from Squirrly SEO by clicking on Download Backup.
- Backup SEO: Download all the Squirrly SEO Snippet optimizations by clicking on Download Backup.
- Backup Briefcase: Download all Briefcase Keywords by clicking on Download Backup. (ONLY the actual keywords will be included in the backup, so the backup doesn’t include Labels and other similar data)
- Backup Redirects. Download all the Squirly SEO Redirects by clicking on Download Backup.
- Backup Schemas. Download all the Squirrly Schemas for Rich Snippets (including Reusable Schemas) by clicking on Download Schemas.
!! You will need these files to restore the settings and all the pages optimized with Squirrly SEO.
Restore Settings & SEO
- To reach this section, go to: Squirrly SEO > Technical SEO > Import & Data > Restore Settings & SEO
In the previous section, we showed you how to back your settings, SEO snippets and Briefcase Keywords. But, how do you then import them back to Squirrly SEO?
By using the Restore Settings & SEO section.
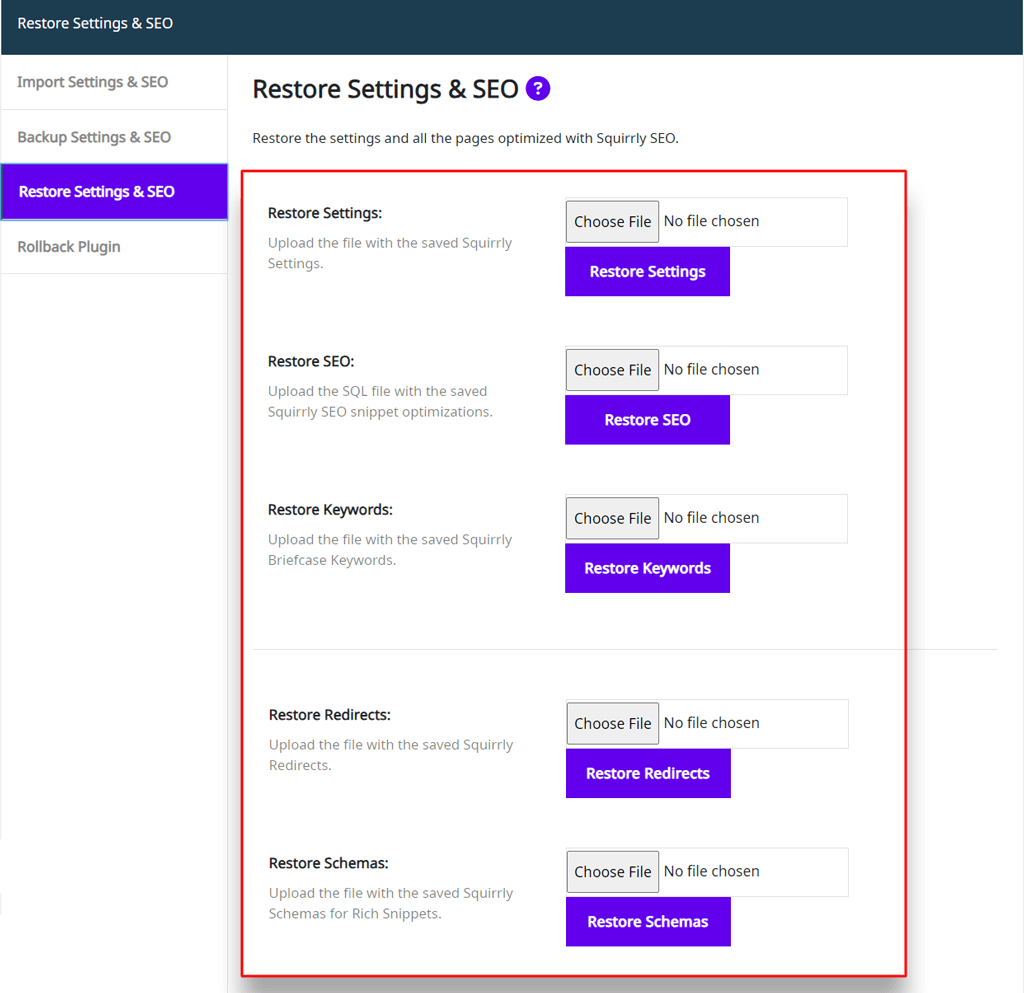
Restoring the settings and all the pages optimized with Squirrly SEO is pretty straightforward.
- To restore settings: upload the SQL file with the saved Squirrly Settings and then click on Restore Settings.
- To restore SEO Snippets: upload the SQL file with the saved Squirrly SEO snippet optimizations and then click on Restore SEO.
- To restore Briefcase Keywords: upload the SQL file with the saved Briefcase Keywords and then click on Restore Keywords.
- To restore redirects: upload the SQL file with the saved Squirrly SEO Redirects and then click on Restore Redirects.
- To restore schemas: upload the SQL file with the saved Squirrly Schemas for Rich Snippets (including Reusable Schemas) and then click on Restore Schemas.
You can also use this functionality to re-use the settings you’ve configured with Squirrly SEO on different websites. However, we advise against it – and 100% recommend using this function only to restore the Settings and SEO you’ve made for a certain site – on that specific site.
Another thing you should note about the restore process: Whenever the settings are restored, they overwrite the existing settings. That means your existing settings which you may have made using other plugins may be lost forever.
Be careful with this and you should have no problems.
Rollback Plugin
- To reach this section, go to: Squirrly SEO > Technical SEO > Import & Data > Rollback Plugin
There may be some rare instances in which a new version of the plugin has some bugs or errors. To prepare for those cases, we gave you the option to rollback to a version of the plugin that is 100% stable.
In this section, you can rollback Squirrly SEO plugin to the last stable version with just one click.

Reinstall Current Squirrly SEO Version
- To reach this section, go to: Squirrly SEO > Technical SEO > Import & Data > Rollback Plugin
In case there are minor updates made to the current version of the plugin (updates that don’t require launching a new version of the plugin), you can simply use the reinstall current version function to ensure all updates are included.
Reinstall the current version of the plugin by clicking on Reinstall Current Version.