Advanced Settings

This section does NOT include MUST-HAVE, mandatory SEO settings, so you don’t have to worry about this if you are an SEO beginner. Everything you need to achieve perfect SEO for your site is covered by the other features that Squirrly SEO offers.
We created Advanced Settings as a response to requests coming from SEO experts who wanted to perform very specific actions and configurations using Squirrly.
That said, we’ll go through every option available in the Advanced Settings section and provide more details about what each one of them refers to.
Access Advanced Settings
Advanced Settings are located within the SEO Settings section of Squirrly SEO. Navigate to Squirrly SEO > Technical SEO > Tweaks & Sitemap > Advanced Settings to reach it.
NOTE! Advanced Settings are only available when using Squirrly SEO in Expert Mode.
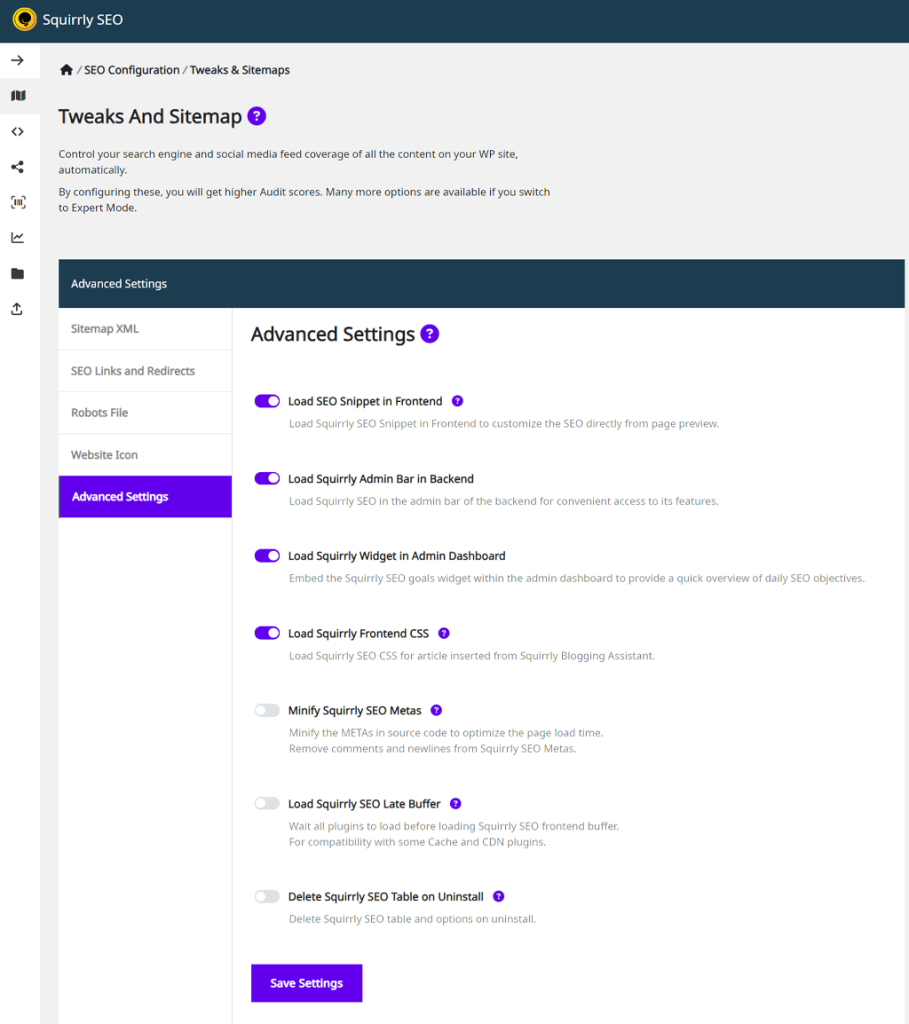
Load Squirrly Admin Bar in Backend
- To reach this option, go to: Squirrly SEO > Technical SEO > Tweaks & Sitemap > Advanced Settings > Load Squirrly Admin Bar in Backend
By enabling this option, the Squirrly SEO menu will be accessible through your WordPress admin bar, providing a handy shortcut to its features.

Load Squirrly Widget in Admin Dashboard
- To reach this option, go to: Squirrly SEO > Technical SEO > Tweaks & Sitemap > Advanced Settings > Load Squirrly Widget in Admin Dashboard
When activated, this option embeds the Squirrly SEO goals widget directly within your WordPress admin dashboard, providing a quick overview of your daily SEO goals.

Load Squirrly Frontend CSS
- To reach this option, go to: Squirrly SEO > Technical SEO > Tweaks & Sitemap > Advanced Settings > Load Squirrly Frontend CSS
Load Squirrly SEO CSS for Twitter and Article inserted from Squirrly Blogging Assistant. By default, this option is turned ON.
But you also have the option to turn it OFF by sliding the toggle to the left.
When this option is switched ON, Squirrly will load a CSS file for the Squirrly Blogging Assistant. For example, for importing a Tweet Box (which allows you to display a Tweet directly inside an article or page), a specific format is used.
To ensure that format will be kept in the frontend as well, it’s best to load this CSS.
<link rel='stylesheet' href='/wp-content/plugins/squirrly-seo/view/assets/css/frontend.css' type='text/css' />If you use the Blogging Assistant, make sure to ACTIVATE this option to ensure everything will look great.
In case you do NOT use the Blogging Assistant and you don’t want this CSS to load, turn this option OFF.
! Important
Having this option turned ON does NOT impact site speed.

Minify Squirrly SEO METAs
- To reach this option, go to: Squirrly SEO > Technical SEO > Tweaks & Sitemap > Advanced Settings > Minify Squirrly SEO METAs
Turn ON or OFF: Minify Squirrly SEO Metas.
Turning this option ON will minify the metas in order to compress the source code and optimize the page loading.
Having this option turned on can help with caching, but it’s NOT mandatory to activate this option, unless, for example, a possible client specifically asks for this type of configuration.

Squirrly SEO Late Buffer
- To reach this option, go to: Squirrly SEO > Technical SEO > Tweaks & Sitemap > Advanced Settings > Squirrly SEO Later Buffer
Squirrly SEO is compatible with the vast majority of Cache and CDN plugins.
However, there may be some Cache and CDN plugins that don’t work properly if Squirrly loads too fast. These cases are very rare.
Even so, to ensure compatibility with such Cache and CDN plugins as well and prepare for possible errors, we added the option to: Wait for all plugins to load before loading Squirrly SEO frontend buffer.

Multilingual Support
- To reach this option, go to: Squirrly SEO > Technical SEO > Tweaks & Sitemap > Advanced Settings > Multilingual Support
With this setting, Squirrly makes it possible to convert the other encodings to UTF8 and avoid ajax errors.

Delete Squirrly SEO Table on Uninstall
- To reach this option, go to: Squirrly SEO > Technical SEO > Tweaks & Sitemap > Advanced Settings > Delete Squirrly SEO Table on Uninstall
When this option is turned ON, the Squirrly SEO table and options will be deleted from the database when you delete Squirrly from a WordPress site. No trace of information will be left behind. Everything will be deleted from the database.
Only activate this option when you are 100% sure you no longer want to use Squirrly SEO and need to permanently delete everything from the WordPress site regarding Squirrly SEO.
If you want to leave Squirrly SEO, you’ll still need to close the Cloud Account, though !!! Remember to also log into cloud.squirrly.co